Låtefossen Waterfall Hike – The Hidden Trail, Norway
While Låtefossen is one of the most impressive and powerful waterfalls in Norway, few people realize there’s also an option for a short hike up the side of the waterfall. The trail is a bit hidden, but it’s relatively easy to find. It offers a few additional viewpoints close to the waterfall, in addition to the views from the Låtefossbrua and just below the bridge.

Låtefoss
The total height of the Latefossen waterfalls is about 165 meters, and they are mighty impressive. Even when I visited in September, the volume of water going through the falls was staggering. I can’t even imagine what they’d look kike after heavy rain or earlier in the season, around June or July.
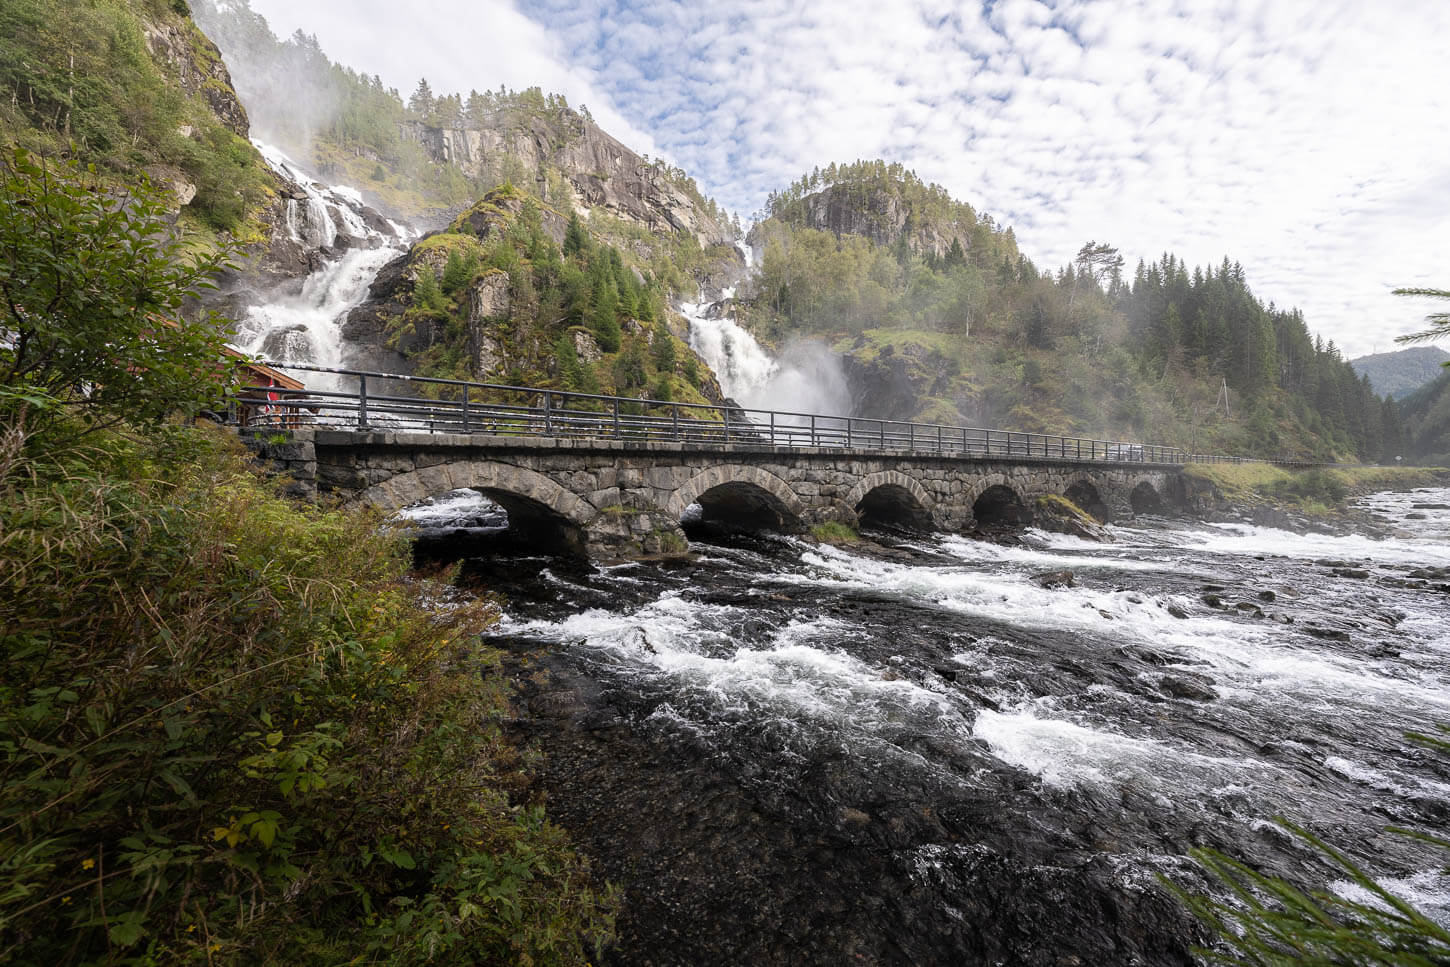
Låtefossen is actually the plural of Låtefoss, as in fact it’s a twin waterfall that merges into one at the bottom by the bridge that crosses it. It’s quite a short trail that offers better views of the upper sections of the falls. You can easily do it alongside the quick stop by the bridge in front of the waterfall.
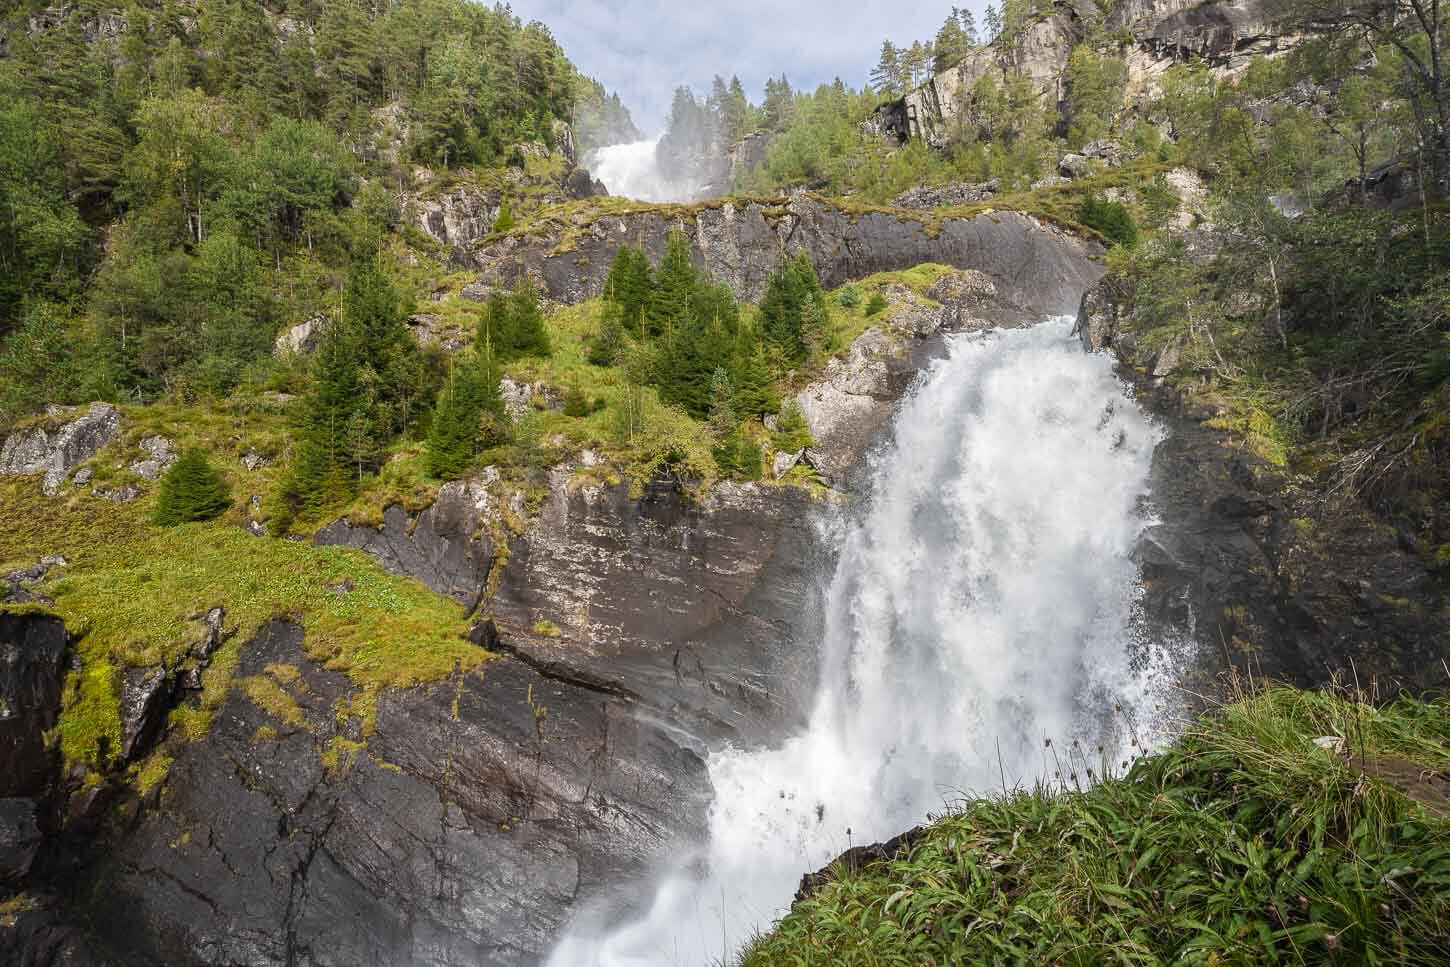
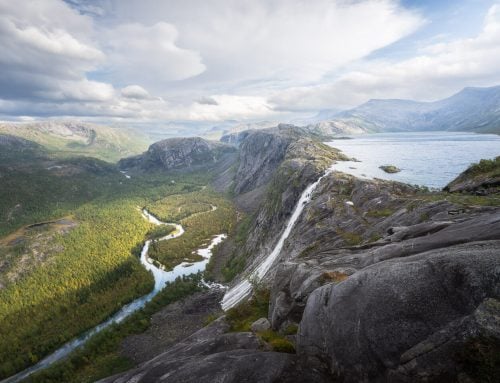
Låtefoss upper viewpoint
Table of Contents
Overview of the Låtefossen Waterfall Hike & Map
This hike is really a short walk into the woods to two different viewpoints above the waterfall. It’s an easy walk on an unmarked, but visible path that leads to two additional viewpoints
| Max Altitude | 235m |
|---|---|
| Distance | 1.34KM |
| Elevation gain | 60m ↑ / 60m ↓ |
| Hike time | 00:40/ 00:50 Hours |
| Hike Difficulty | Easy |
Here is the map of the hike. You can download the GXP file for free from the activity linked below.
How to get to the Låtefossen trailhead and Parking
Låtefossen is a must-stop for anyone driving to or from Odda. Located directly on road 13, it takes about fifteen to twenty minutes to drive from Odda to Låtefossen from the north. Otherwise, if you are coming from the south, you’ll get to Låtefossen shortly before arriving in Odda, so you can plan a visit as a quick stop if you have already planned to visit Odda or to do more hikes in the area, like Trolltunga or Bruarbreen.
You can visit Låtefossen in winter too, but the volume of water will be greatly reduced and most of the falls frozen over.
- Driving Directions: from Odda, drive across town toward Skare and take road 13; you’ll find the waterfall on your left after about fifteen minutes of driving. From the south, turn onto road 13 to Skare from road E134. Drive slowly when approaching the waterfall, as there will be some people hanging on the rather narrow bridge taking photos.
- Parking: There is a small parking area right next to the bridge toward Odda, but Good luck :)! Seriously, the parking area is rather small, only for a few cars, and it’s not unusual to find buses or gigantic RVs taking up a few spots. Also, cars are hanging around with the hazard lights on, waiting for a parking spot to be available. I drove past a couple of times, and then I went straight to park in a flat area on the side of the road. It’s here on Google Maps. You can also use the GPS file I shared above as a reference point.
- Public Transport: There isn’t a bus stopping directly at Låtefossen, but bus 640 from Odda stops nearby, bus stop Skarsmoen. The timetable is here.

The starting point of the trail that leads to the upper viewpoints.
The Låtefossen Hiking Trail
If you park at the “official” parking area, you can visit the main viewpoint right away. It’s right next to the parking area before the bridge. You can also walk behind the small hut on the other side of the road, and up to the left of the river. However, that’s only possible up to a certain point before it gets too rocky, steep, and slippery to continue.

Låtefossen viewpoint behind the hut/visitors center
Now onto the other trail on the opposite side of the waterfall. To get there, you need to walk across the bridge first. An umbrella or rain jacket may be helpful here :). Really, the water vapor generated by the waterfall is like intense drizzle. At the same time, from the bridge, you have the best views of both sides of the waterfall.

Once across the bridge, keep walking and keep an eye to your left for the trail that seems to lead up into the forest. It’s right next to a small pull-out area and, in summer, it may be hidden by cars parked there. That’s the trail you need to take.
As you hike up, first the views will open up toward another impressive waterfall, Espelandsfossen, which is located on the opposite side of the valley.
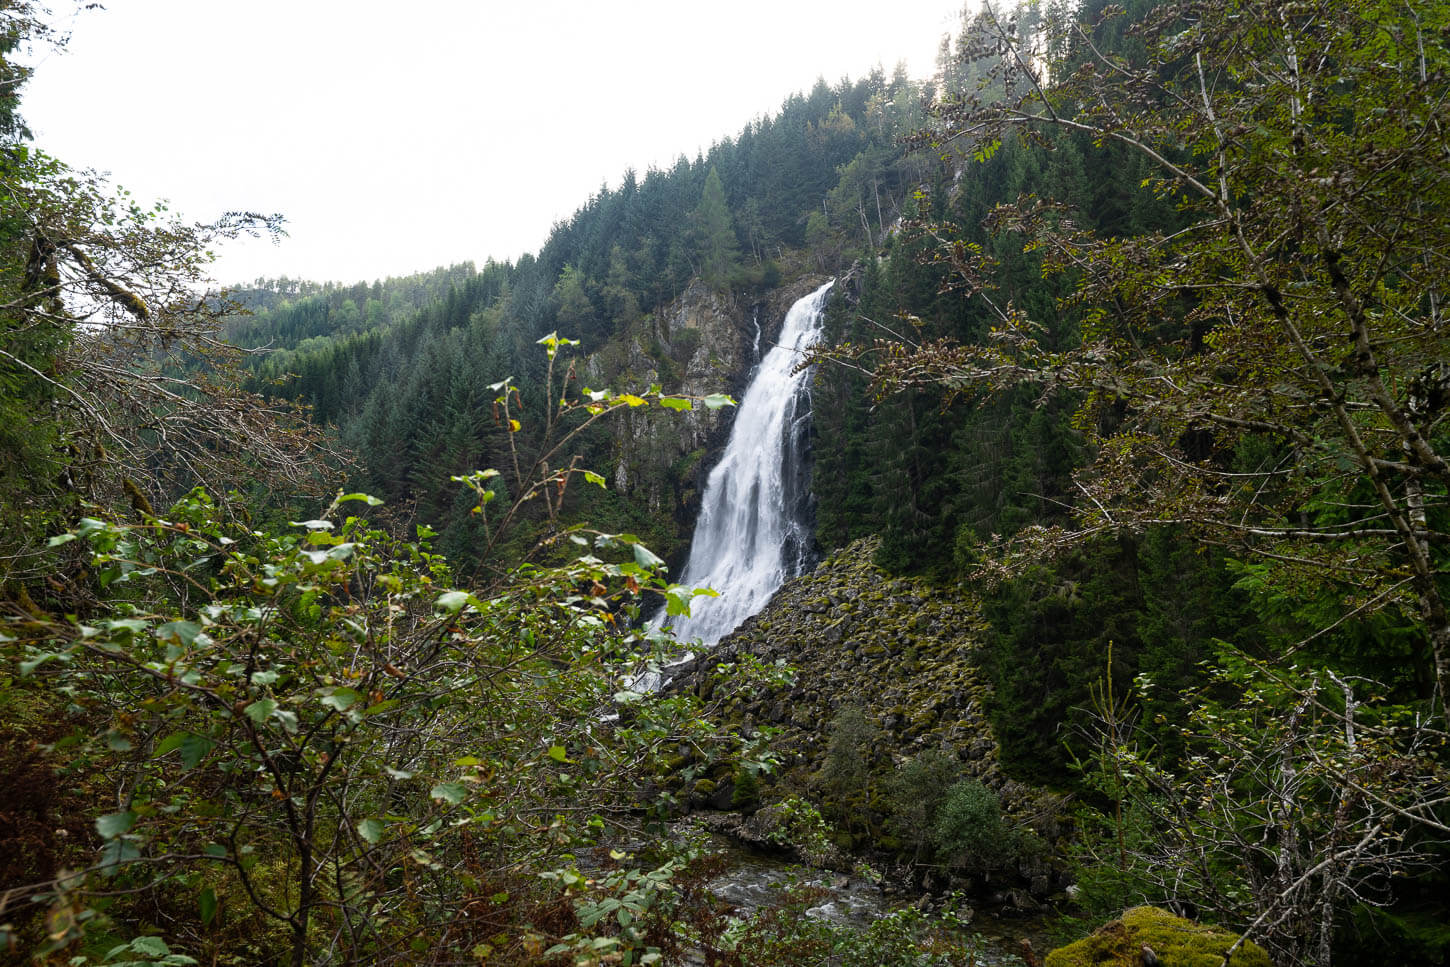
Espelandsfossen.
Then the trail continues up into the bushes to the first viewpoint above the falls. From this first viewpoint, you have a good frontal view of one of the two sides of the waterfall.
From there, it continues further up for a bit to another, wider viewpoint next to the waterfall. This viewpoint offers a better view of the upper section of the other side of the waterfall.
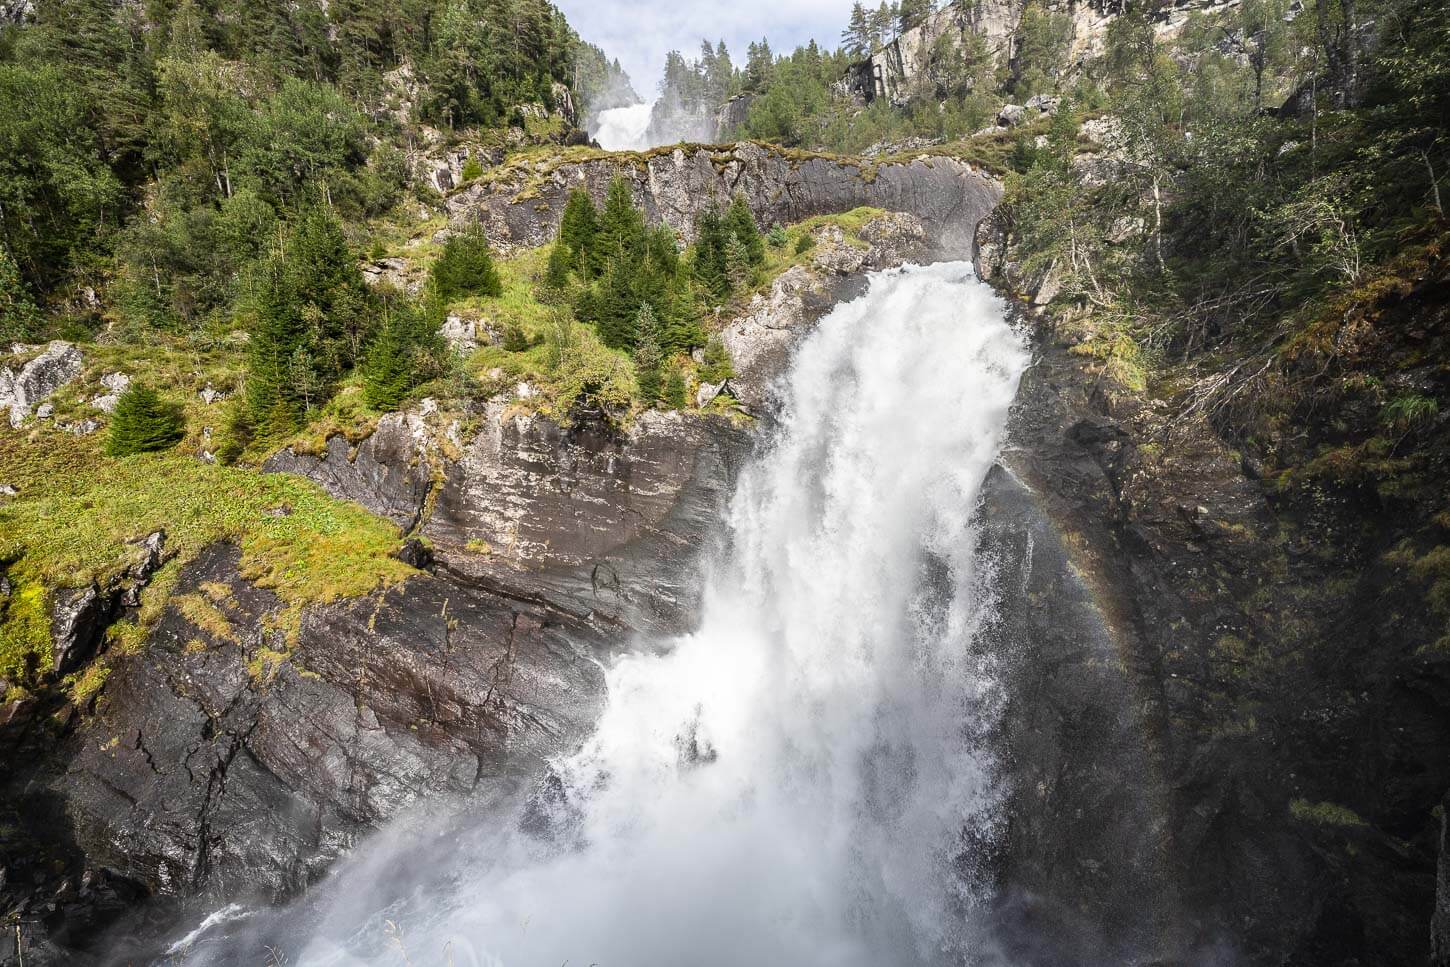
The first of the two upper viewpoints.

The trail stops there, and there does not appear to be any safe way to continue further. A bit of a fun fact: there used to be some sort of building there, as can be seen in this historical photo from Wikipedia. Essentially, this trail appears to be what remains of the old access road to a building that no longer exists.
Låtefossen Photos and Photography Tips
The main and most photographed viewpoint of Låtefossen is right below the main parking area, in front of the hut. It’s easily accessible, but you’re essentially on the riverbed, so where you can get to depends on water levels, so compositional options depend on that too. The river, however, isn’t very deep, so you may have some room to tiptoe around on the rocks to find the most suitable viewpoint.
The upper viewpoints offer a better sense of how powerful this waterfall really is, but also how big it really is. While the view from the bridge, I think, is the best. Yes, I personally preferred the view from the bridge to the classic one that includes the bridge, simply because the waterfall is a little too hidden there.

The upper section gives a better sense of the power of this waterfall.
The view from the bridge was my favourite, as the falls fill the frame.
The classic view of the broidge with the waterfall behind.

An ultra-wide lens is recommended, as you’re essentially next to the bridge and the waterfall is huge. Also, the waterfall is located in a narrow valley, and it faces west, so it does not receive much light throughout the day. Mostly after noon and early-mid afternoon before the sun disappears behind the opposite ridge. For that reason, it’s a good spot to visit when it’s cloudy, and the whole scene is free of small patches
Anyway, don’t forget a microfiber cloth, you’ll need one to remove droplets from the lens’s front element or filter!
Where to stay
Odda is a nice town to stay at for a couple of nights, or for a few days of hiking in the mountains around. It’s a rather tourist-oriented town. I spent a couple of nights at the Trolltunga campsite. It’s nice enough, with a lakeside lawn area you can pitch the tent at. The campsite also has some bookable caravan pitches and some unbookable ones for same-day arrivals.
Additional Resources
- Check out more Hikes in Norway, with Maps!


Leave A Comment