The Háifoss Hike, Iceland
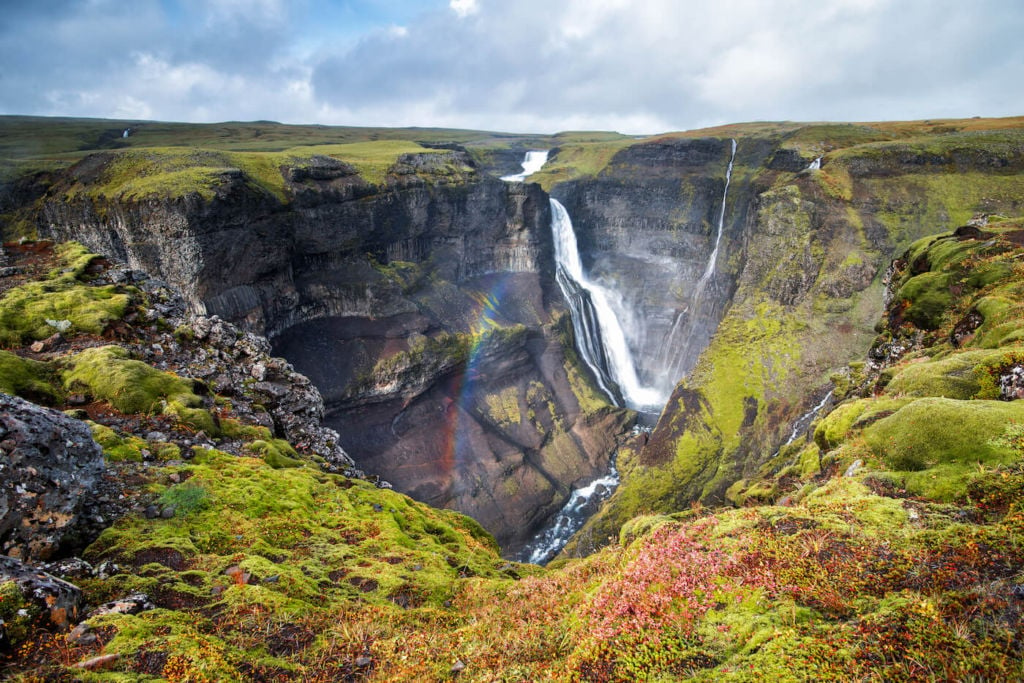
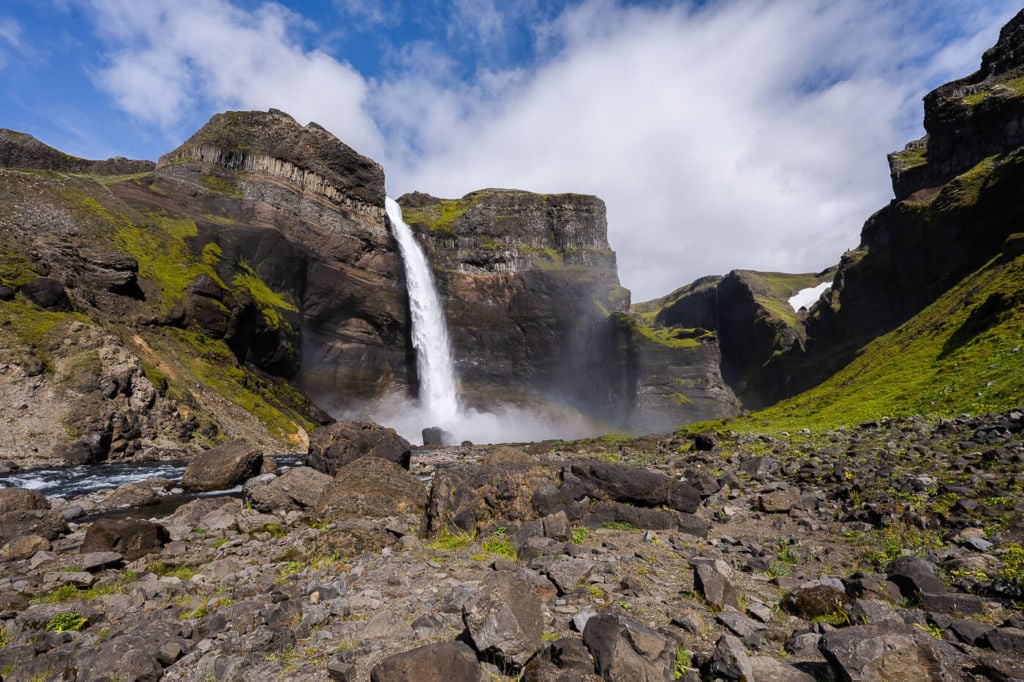
Háifoss is a 122-meter-high (400 feet) jaw-droppingly beautiful waterfall in the south of Iceland, and with its “twin” Granni, they make for a spectacular hike into the narrow gorge at the foot of the waterfall.
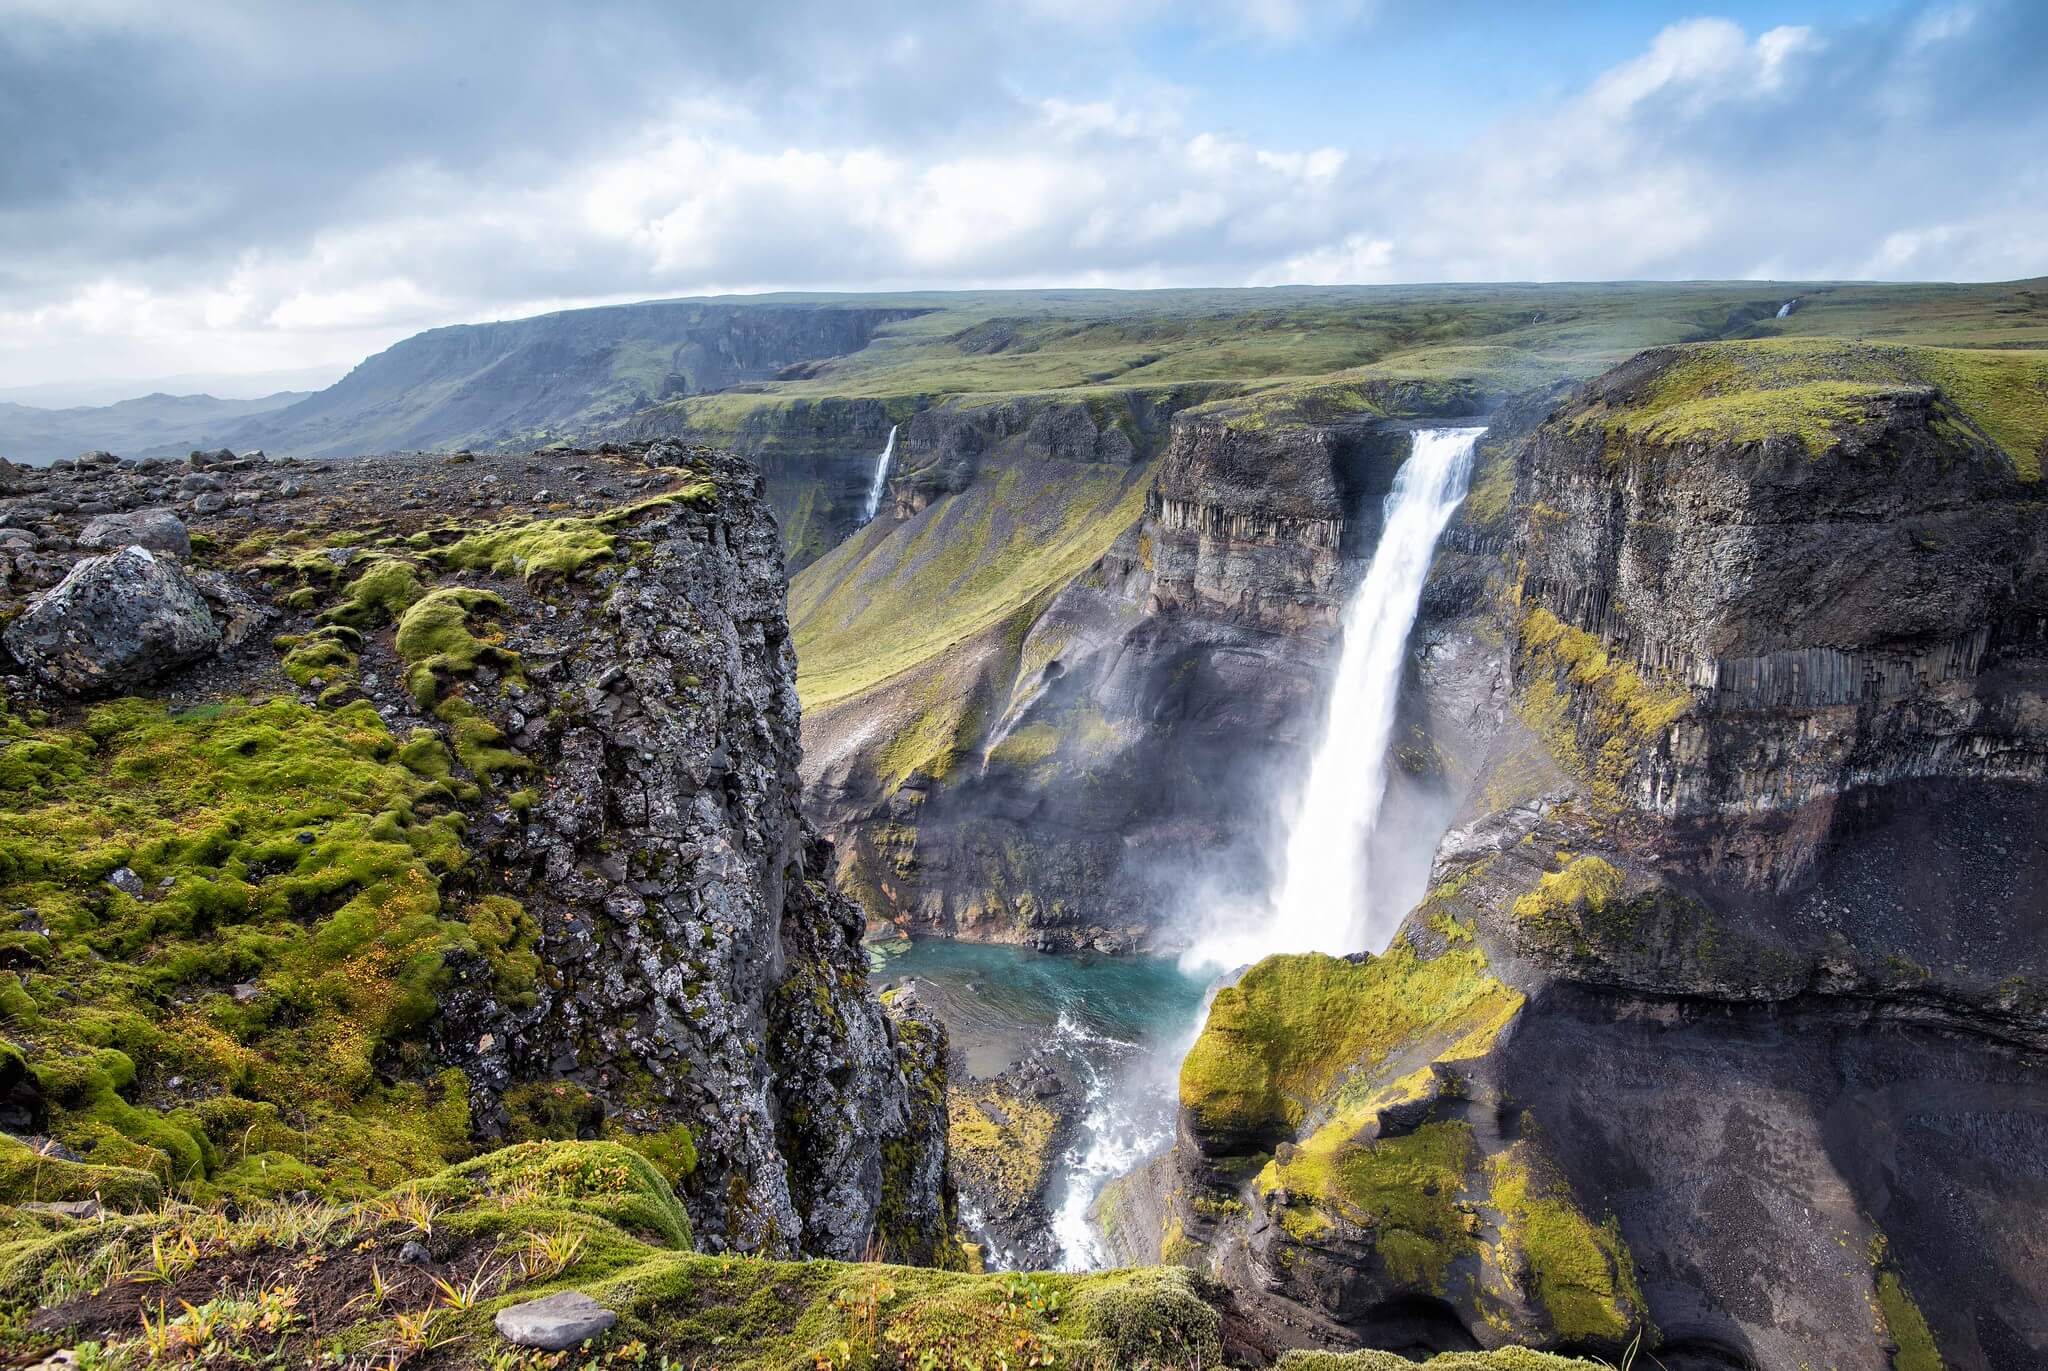
Haifoss.
As if it wasn’t already a popular attraction, Háifoss became even more so due to one of the season finales of the popular TV show “Stranger Things” that depicted the waterfall, though partly with CGI content. Iceland is a filmmaker’s favourite, and with such views, it is easy to see why.
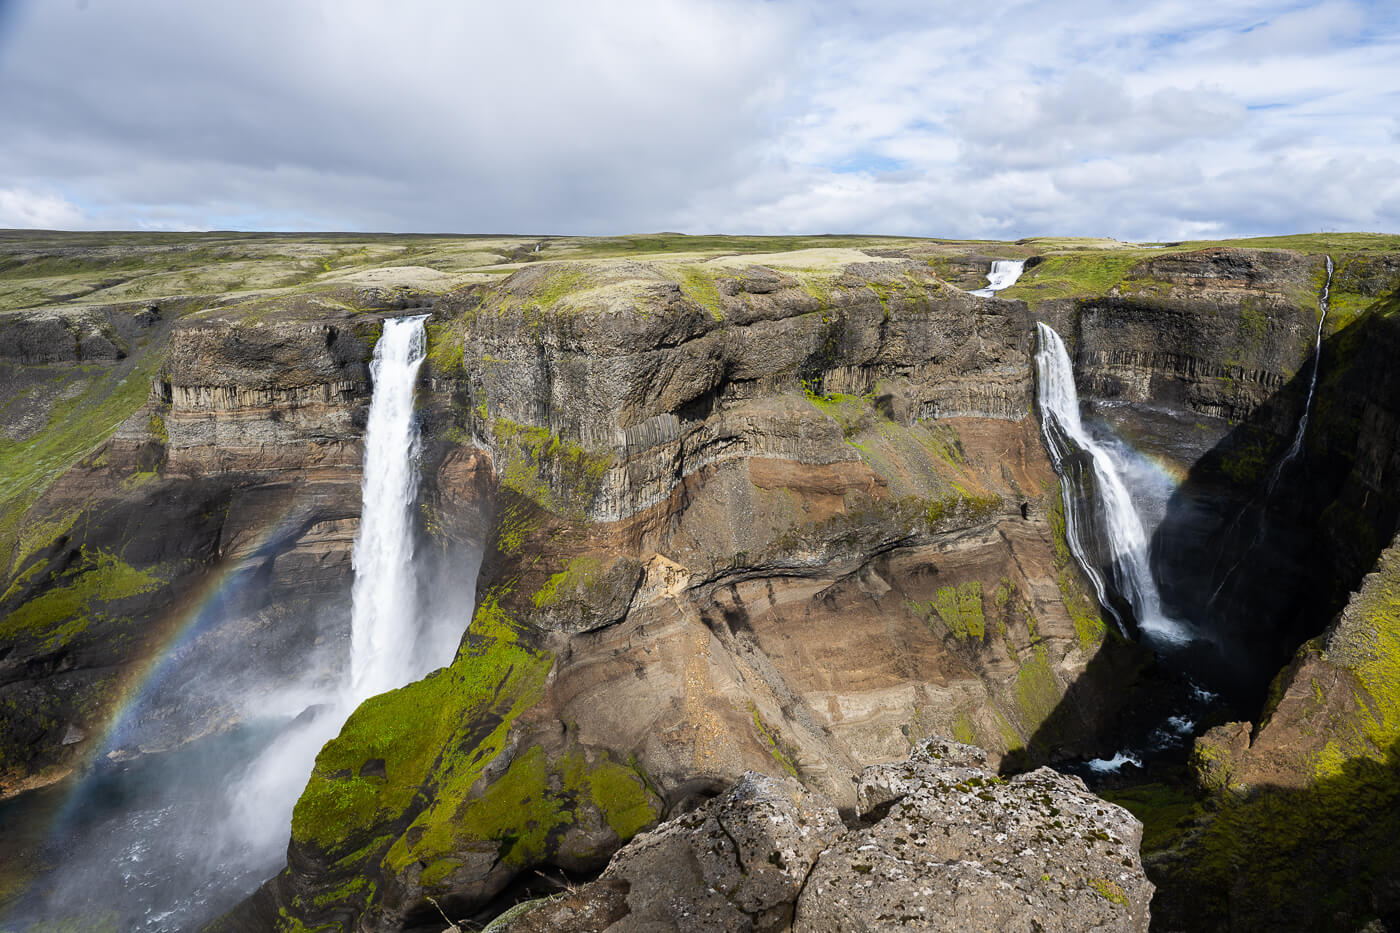
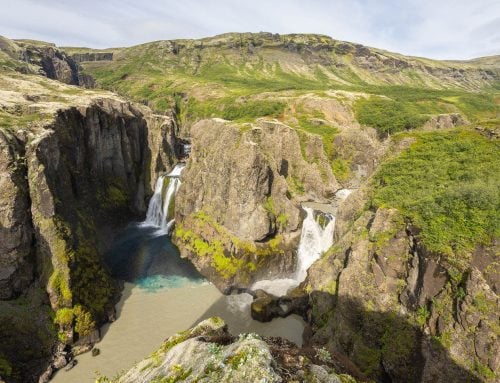
Haifoss, to the left hand side, and Granni, to the right hand side.
However, there’s more to Háifoss.
While the main viewpoint allows you to see both Háifoss and Granni, there is also an option to hike into the gorge below that takes about a couple of hours. The hike to the Haifoss’ base is about 4.57 km (2.8 miles) long and takes a couple of hours. I personally highly recommend the hike into the gorge.
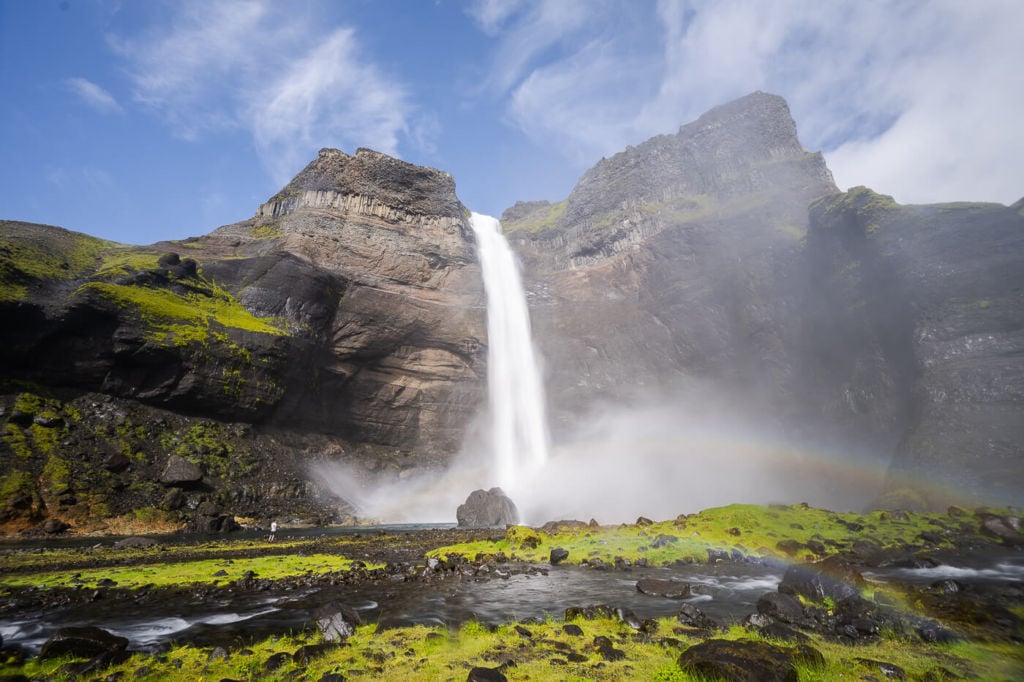
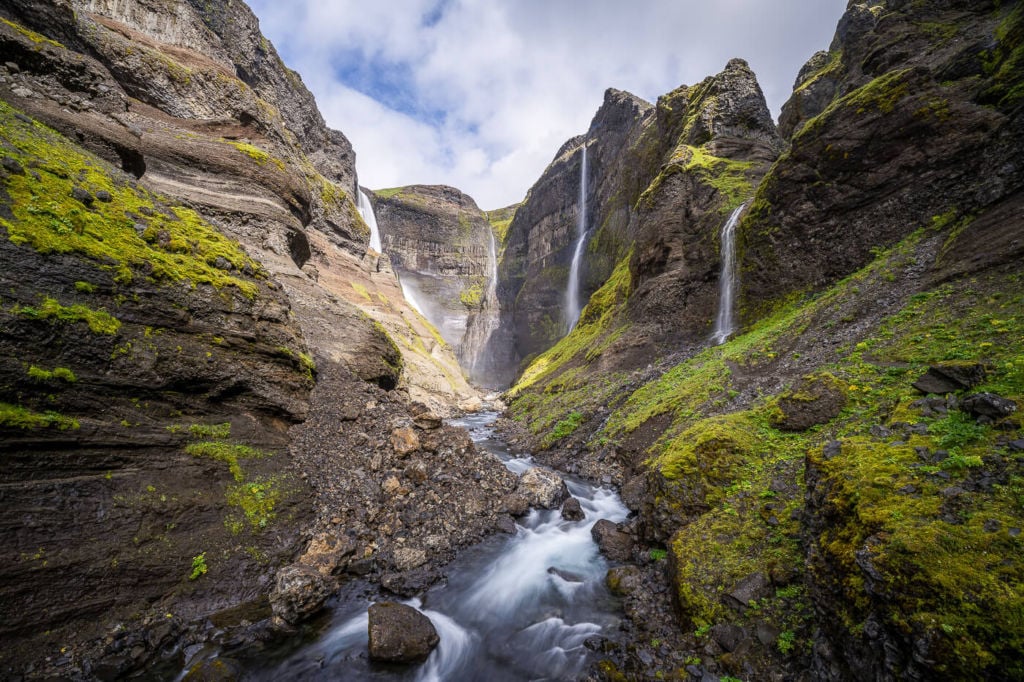
Haifoss is spectacular from below as it is from above. Plus, it will be way less crowded. And, as if that wasn’t enough, you’ll have the option to hike into the narrow gorge at the foot of the waterfall, where an epic view of several smaller streams cascading into the gorge awaits you.
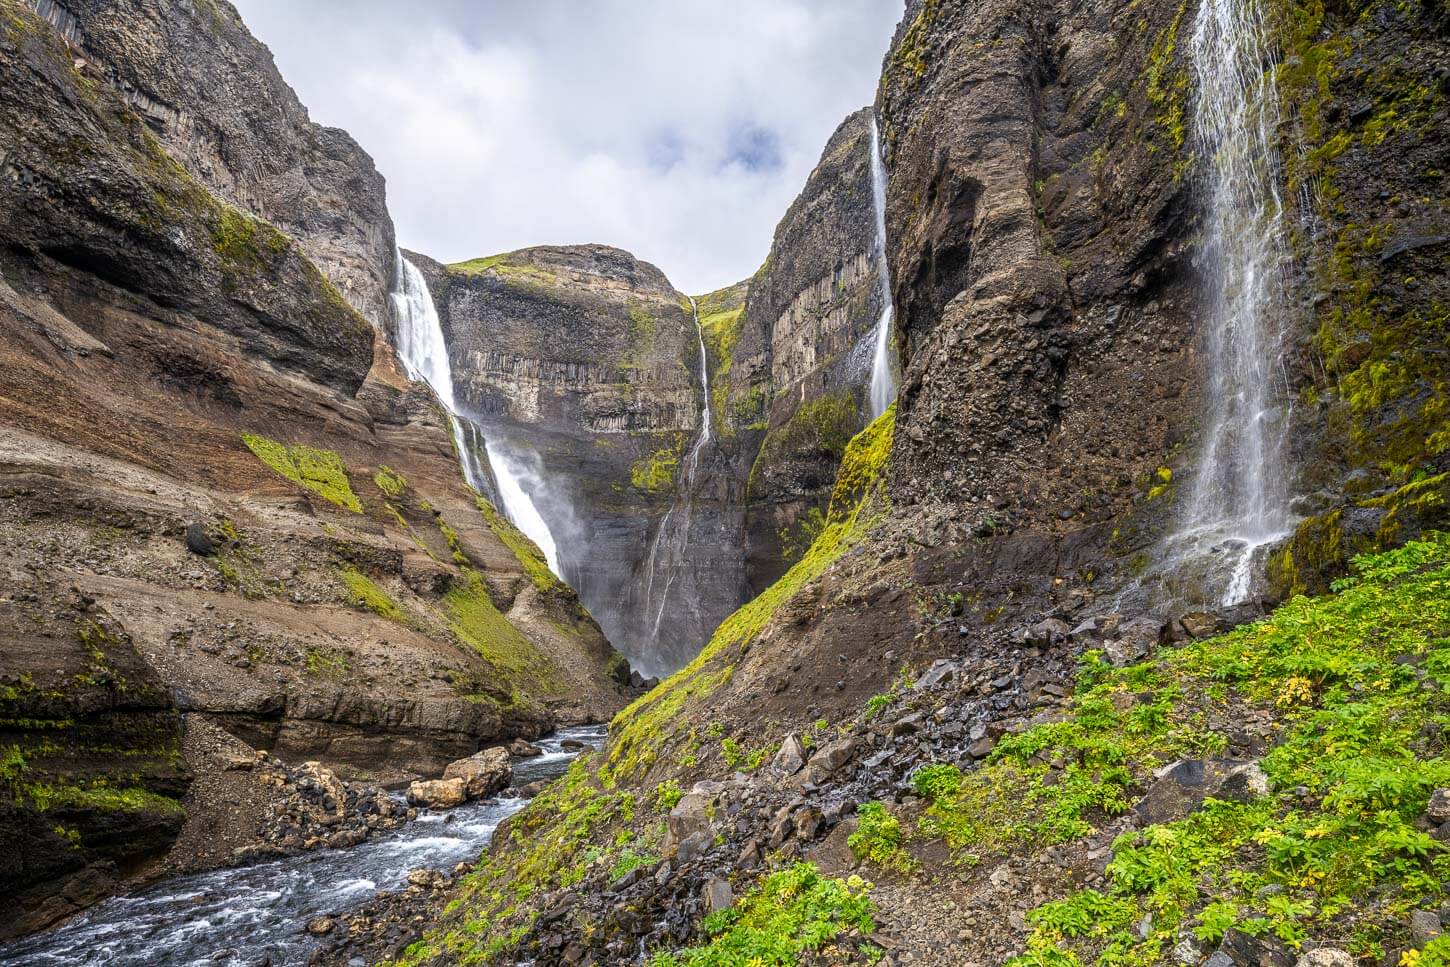
Into the gorge below Haifoss, with Granni partly visible in the background.
Getting to Háifoss requires a bit of a drive on a rough and bumpy dirt road. It may be a scary drive if you are not used to the rough Icelandic gravel roads, but it is possible to drive it with a 2WD car. However, access will be improved in the coming years.
If you want to discover more beautiful waterfalls like this, you may want to check out my eBook guide, “Iceland – The Best Waterfall Hikes and Walks“.
Going to Iceland? Get a Car Rental Discount!
As a reader of The Photo Hikes, you get a 5% discount on your car rental when booking with Blue Car Rental through this website. The discount will be automatically applied to the booking through the following link
Table of Contents
Overview of the Háifoss Hike, When to Go & Map
The main Háifoss viewpoint is just a short walk away from the parking area. So if you want to just visit the main viewpoint, you can walk along the cliffs overlooking both Haifoss and Granni, its twin waterfall, located further into the gorge.
Likewise, the trailhead of the path that leads into the gorge below also starts from the parking area. Again, I highly recommend this hike, at the very least to view Háifoss from below too, as it is an impressive sight.

Haifoss from below.
The hike into the gorge does not require any particular skills, but it is a bit on the rocky side, although never steep. Typically, it is only possible to visit Haifoss from early summer to early autumn, as it is a location that borders the highlands.
| Max Altitude | 405 m (1,328 ft.) |
|---|---|
| Distance | 4.57 km (2.8 miles) |
| Elevation gain | 300 m ↑ / 300 m ↓ (984 ft.) |
| Hike time | 1.5/2.5 hours |
| Hike Difficulty | Easy/Moderate |
Here is the map of the hike. The trail is visible at all times and well-marked. However, you can download the GXP file for free from the activity linked below.
How to get to the Háifoss Viewpoint and Parking
A quick note on the access road: it’s possible to get to Háifoss with a standard 2WD car. It is a rough road that gets periodic overhauls, but due to the amount of traffic it gets, it degrades into a very rough track as the season progresses. But with patience and slow driving, it is possible to do it in any 2WD car. I have been up there several times and saw Toyota Aygos up there too.
If you want some extra peace of mind and comfort to drive the rough track to Háifoss, a Dacia Duster is a classic that will get you there perfectly fine
- How to get to Haifoss and Parking: Haifoss can be accessed via Road 332, a side road 32. To get there from the east, you will need to turn onto Road 30 not long after Selfoss. Then onto Road 32 until the turn onto Road 332 (click here for the exact location). From there, it’s a 10/15 minutes drive to the parking area.
- Start of the Hike: directly from the parking area, keep following the trail until you see the trail posts.
However, there are plans to improve both the access road and the viewpoint in the coming years, so hopefully, access will become easier. Though, as it is today, it’s also part of the adventure that makes this sport special.
The Háifoss Hiking Trail
From the parking area, head toward the lookout over Háifoss and Granni. The site is fenced, and you can follow the fence on the way down the side of the cliff. As you walk further down the cliffs, you will notice orange trail poles marking the trail. That is the trail that leads to the bottom of the falls.
Keep following the trail downhill. After a bit, you will have to climb a small three-step ladder over a fence. Next, the trail will turn to your right, down the side of the cliff. Here it gets a little steeper and rockier. From here, the trail continues down until you reach the bottom of the gorge.
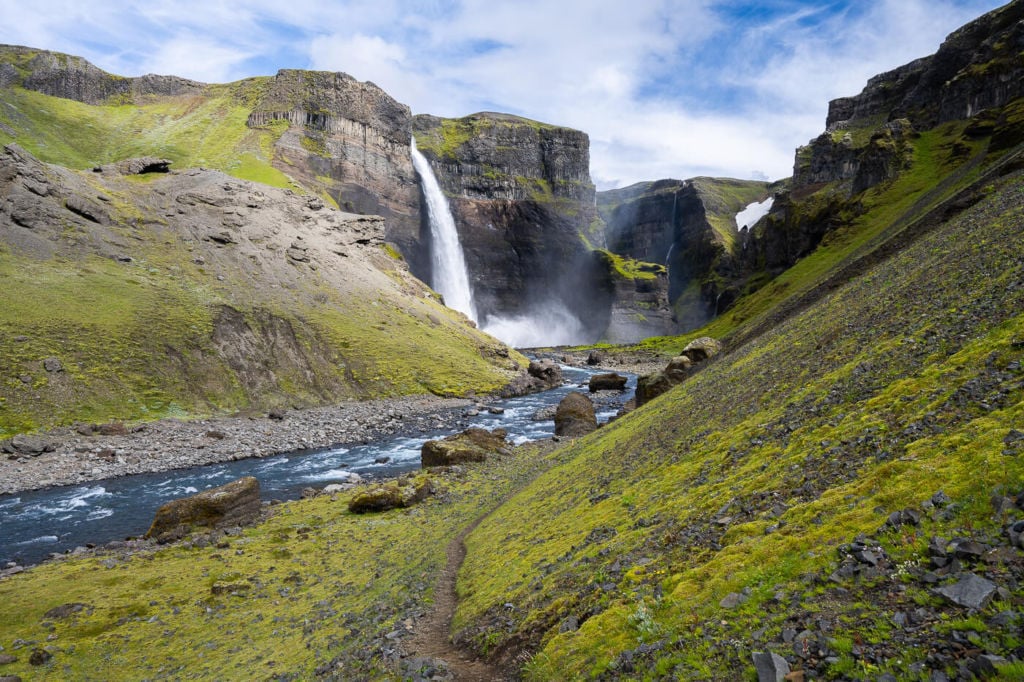
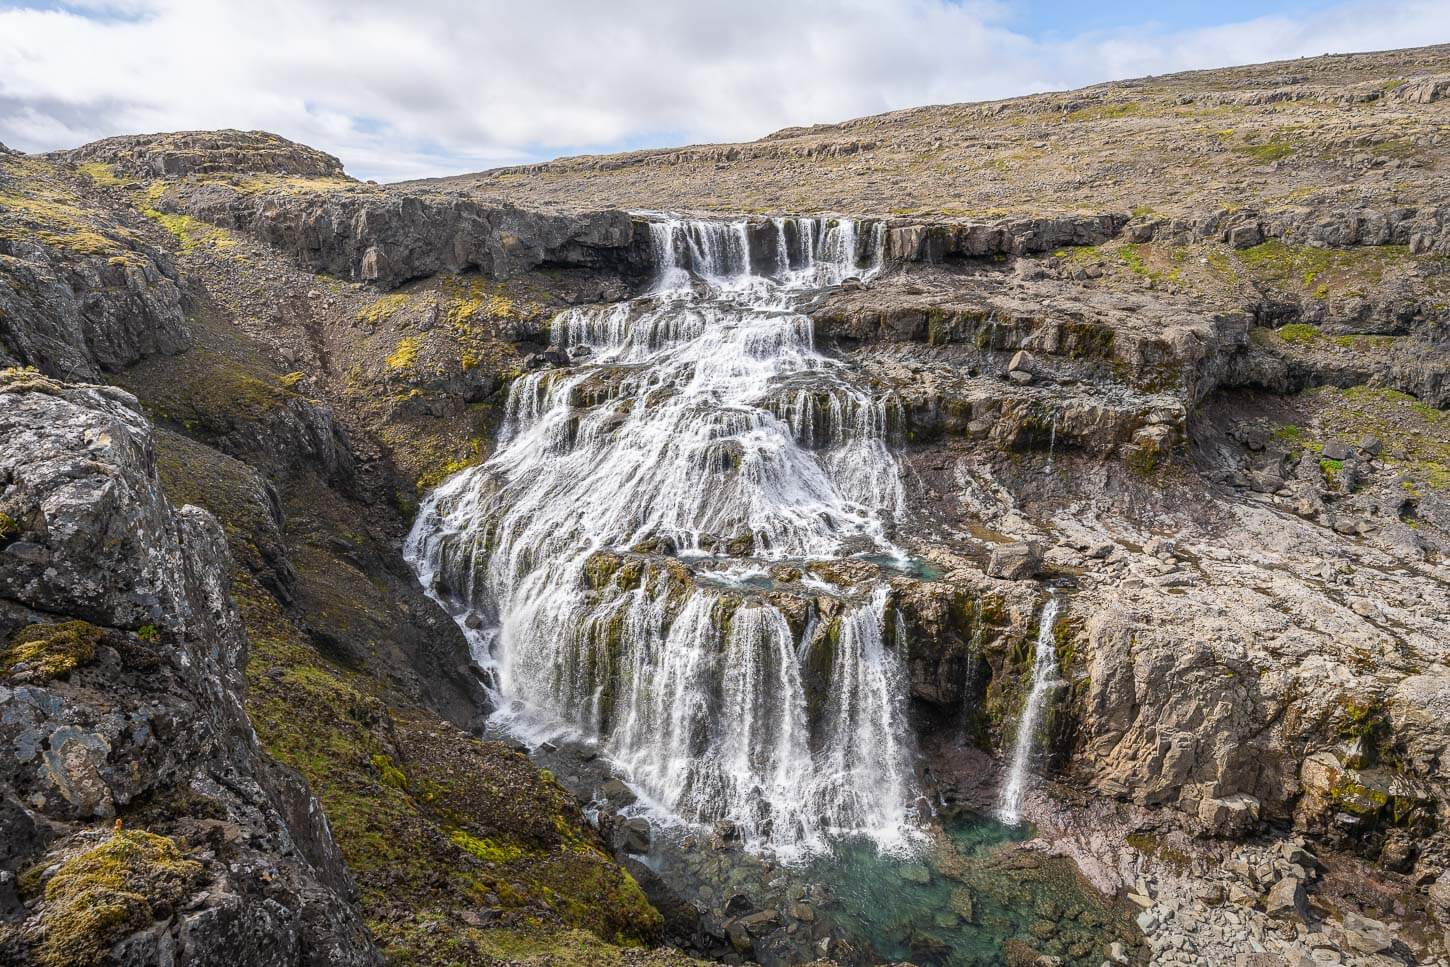
View of Haifoss from the trail
The sight of Haifoss from the bottom of the gorge is nothing short of spectacular. Here, you get a stronger sense of the waterfall’s height and water volume. As well as considerable water spray, depending on wind direction and how close to the waterfall you decide to get.
As you get closer to Haifoss, you will see a faint trail continuing further into the gorge. There will most likely be a lot of water spray from Haifoss, so you may get wet and need to store your camera gear. The rocks may also be slippery. At one point, it will look as if the trail may continue to Granni, but it will end and disappear earlier.
Also, note that this trail does not require you to get into the river, so if you see the trail disappearing in the waters, water levels are probably too high to go any further.
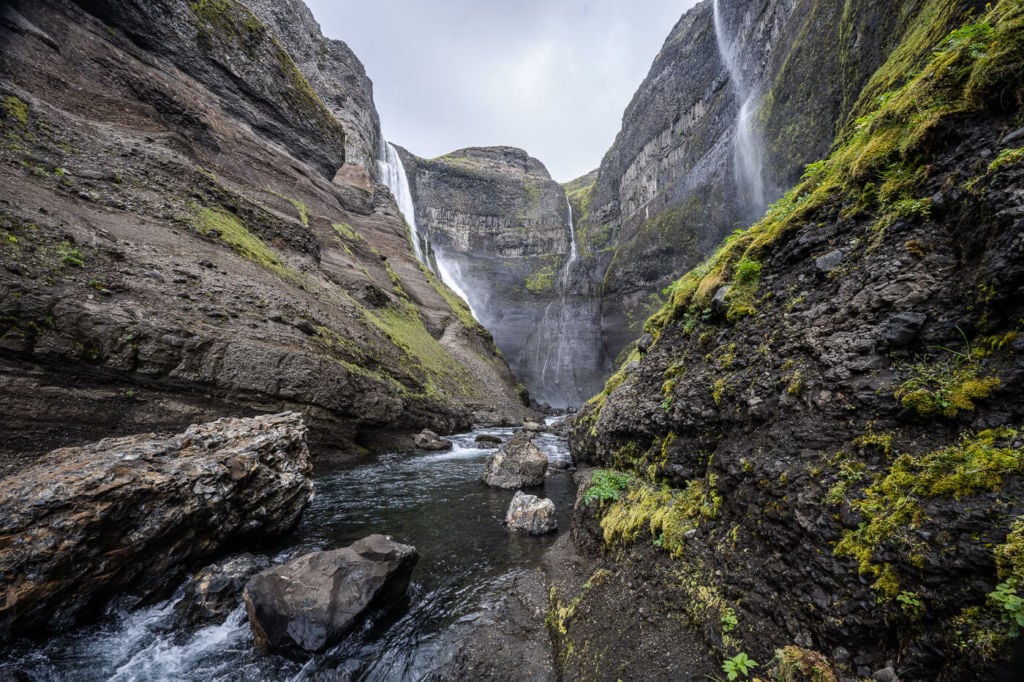
No further signs of the trail after this point. That’s the best view of Granni from inside the gorge.
This is an out-and-back hike, so once you get to the end of the trail in the gorge, you need to get back up the same way.
Photos and Photography Tips for the Haifoss Hike
The top of the gorge is going to be your first stop on this hike. And perhaps your last too, on the way back up. The views from there are spectacular. Haifoss is a fantastic waterfall, and so is Granni. The way the water drops from the cliffs is almost hypnotic to watch. Not only that, but looking down from the vertical cliffs is quite an experience.
There are several good viewpoints both at the top and at the bottom of the gorge. You’ll probably be running around, like I did, trying to find as many different compositions as possible.

Haifoss and Granni in the background.
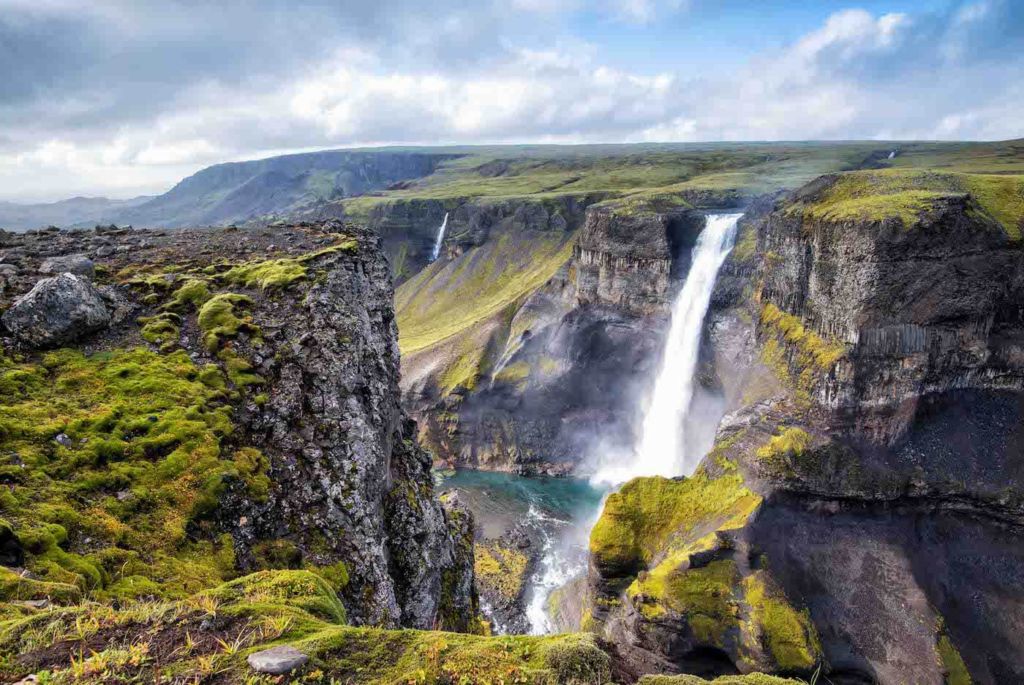
View of the Haifoss waterfall from the top of the cliff.
The Waterfall Granni. This photo was taken in 2014 but today, this vantage point is no longer accessible.
Can you see the “little” guy next to the waterfall?
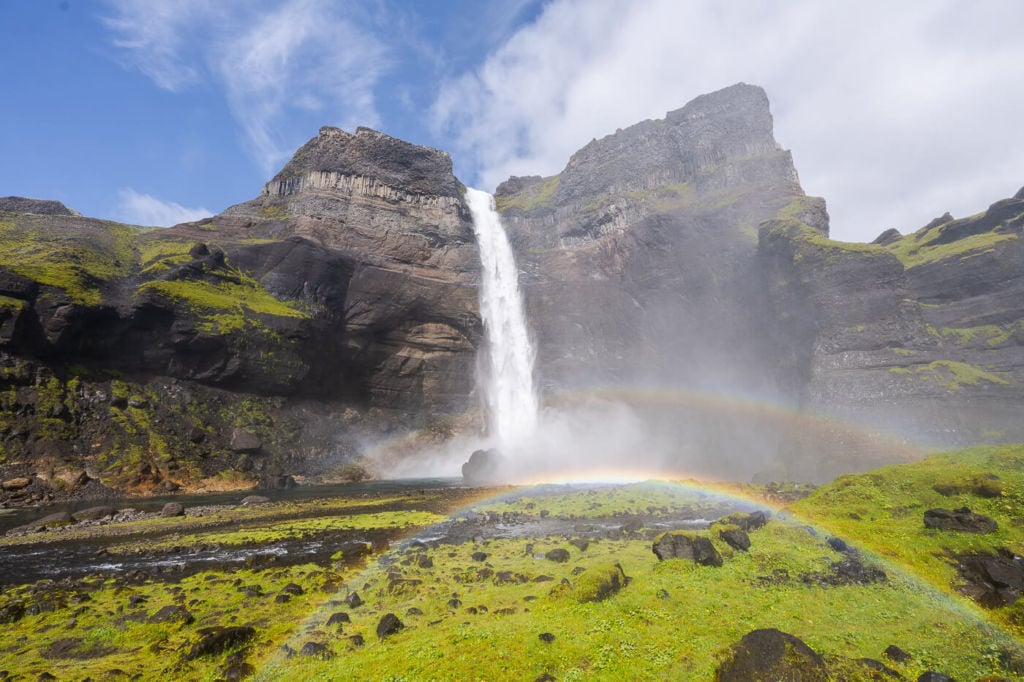
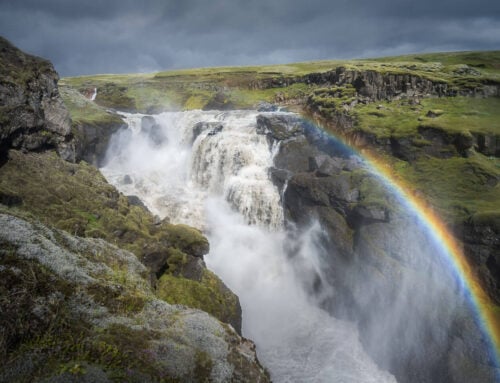
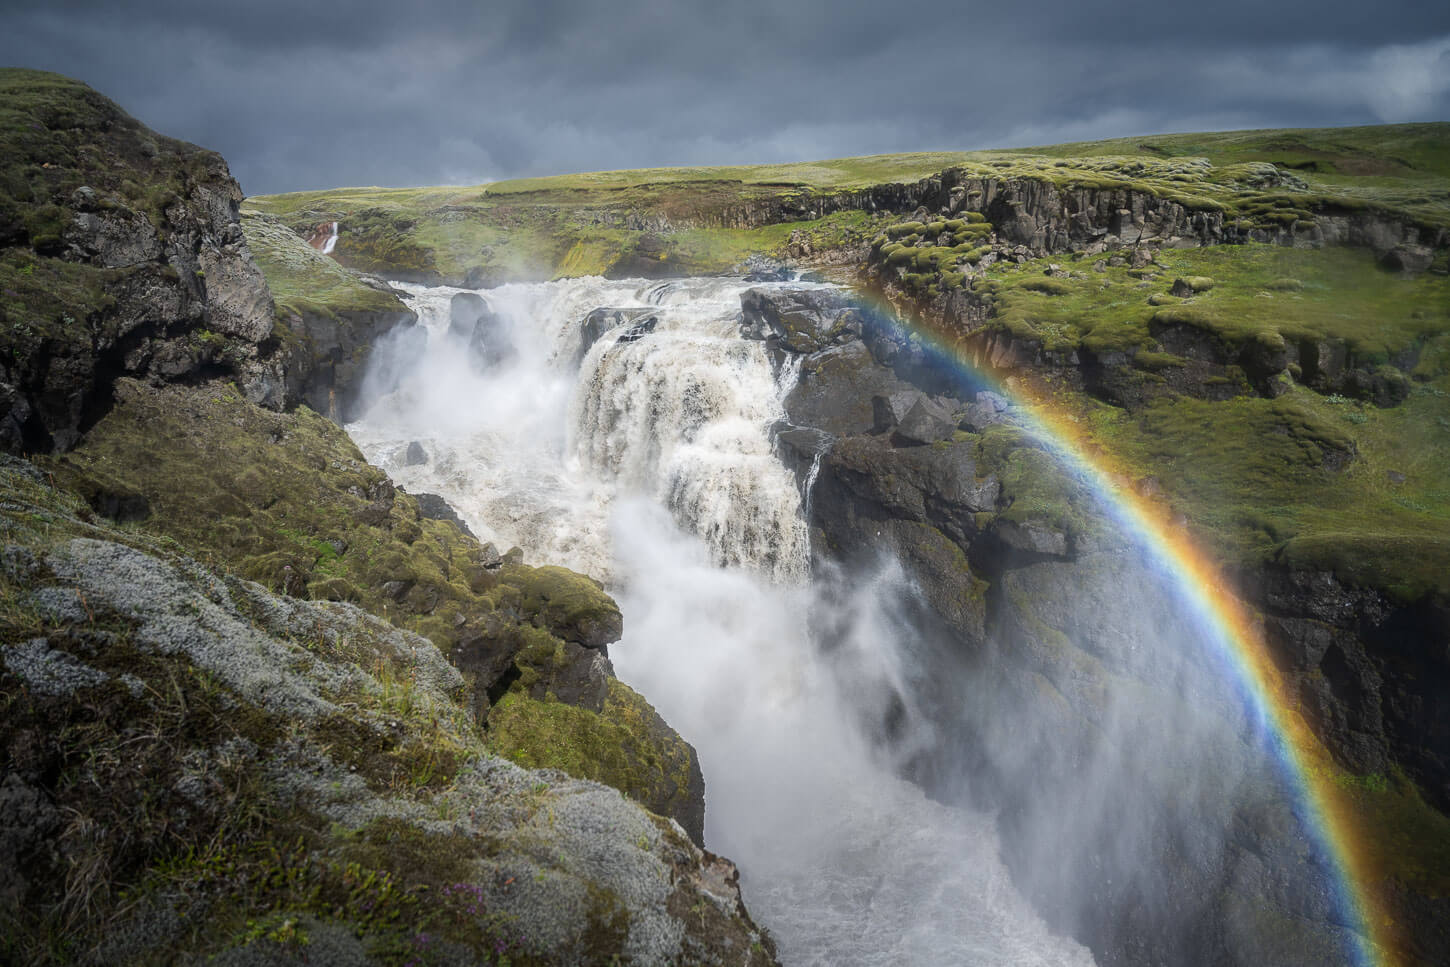
On sunny days, you can use the water spray to include small “water spray” rainbows.
However, as you hike past Haifoss and follow the Fossa River into the gorge, you will not get any good views of Granni. Granni is too hidden at the back of the gorge to be entirely visible.
Inside the gorge, there are a few good vantage points – personally, the best one I have found is a huge boulder you can step on, as that places you almost in the middle of the river. This means you can use the river as your main leading line.


I recommend using ultra-wide lenses here; Haifoss is a gigantic waterfall, and you can get close to it. Same for the gorge. This is one of the few situations I wish I had something a little wider than 14mm.
All in all, the Haifoss Hike is a spectacular one. Here you’ll find several different photo opportunities, even if the location is mainly known for just one waterfall.
Video of the Haifoss Hike
Here’s a short video of the Hike to Haifoss and the hidden gorge below. Nothing fancy, just the trail, the views, and some music:
Where to Stay
There are a few options nearby, the closest being the Highland centre Hrauneyjar or a few guesthouses along road 32. Not a particularly cheap accommodation, though, especially during high season. There are also some camping grounds or hotels a little further down the road or along road 26.
However, you could easily do this hike in a few hours or half a day, and you can easily combine it with other stops or attractions in the area.
Additional Resources
- Discover more beautiful and unique Waterfalls in my eBook guide, “Iceland – The Best Waterfall Hikes and Walks“.
- Check out more Photo Hikes in Iceland here.
Car or Camper Van Rentals
I can definitely recommend two companies here:
- Cars: Blue Car Rental, which is the largest Car rental company in Iceland, and for good reasons. Free Cancellation, Unlimited mileage, 24-hour break assistance, SCDW, CDW, TP, and GP insurance are included in the price. Blue Car Rental is also located within walking distance of the Keflavik Airport, so you can be on your way to explore Iceland right away. I’ve always been happy with my rentals there, which is why I’m happy to recommend their services here on my blog.
- Camper Vans: CampEasy. With CampEasy, you can rent 2WD or 4×4 campers alike. With a raised Chassis, larger tires, and extra insurance with reduced liability for river crossing, their 4X4 campers are the best choice for your trip into the Highlands. Their Website also provides extensive information about roads you can take and instructions on river crossings. Perfect choice for a hiking holiday in the highlands!
These are my two favorite companies in each respective rental area, which I why I am happy to recommend both here. If you also like this blog, booking through them is a great way to support it. I’ll get a small commission fee at no additional cost, so you can essentially support the running costs of this blog for free too.


It would be prudent and quite helpful if the author had stated at least 3 times in the beginning of the article the exact country location.
It’s fun to read the article and the photos are fantastic but not everyone can vacation and hike in Iceland! A bit disappointing to have to source the location to then discover it to be highly improbable of ever visiting the area/country.
Thank you
Hi John,
Thanks so much for the comment. I’ll make sure to update all the posts accordingly.
Marco
amazing! thank you for this recommendation and super detailed post, I have added it to my itinerary ^^
Thanks, glad that helped – enjoy this amazing location!
Hello
We tried to go to Haifoss today, but the road was not good enough for our Kia Ceed – it definitely needed a 4WD vehicle. Perhaps our GPS took us to the wrong road- it did that later for Bruarfoss.
Hi Chantelle – I haven’t been there in a couple of years but it’s entirely possible that the road may have degenerated to the point of not being suitable for 2WD cars, especially if they have not repaired it in recent month. it’s always been a rough road, and with the traffic it gets it probably degrades rather quickly even after repairs.