Hike to Cascate del Rutor – Epic Waterfalls Hike in Val d’Aosta, Italy
The Hike to le Cascate del Rutor is the most epic waterfalls hike in Val d’Aosta.
Located near La Thuile and Courmayeur, the Rutor Waterfalls are some of the most powerful and impressive in the Italian Alps.
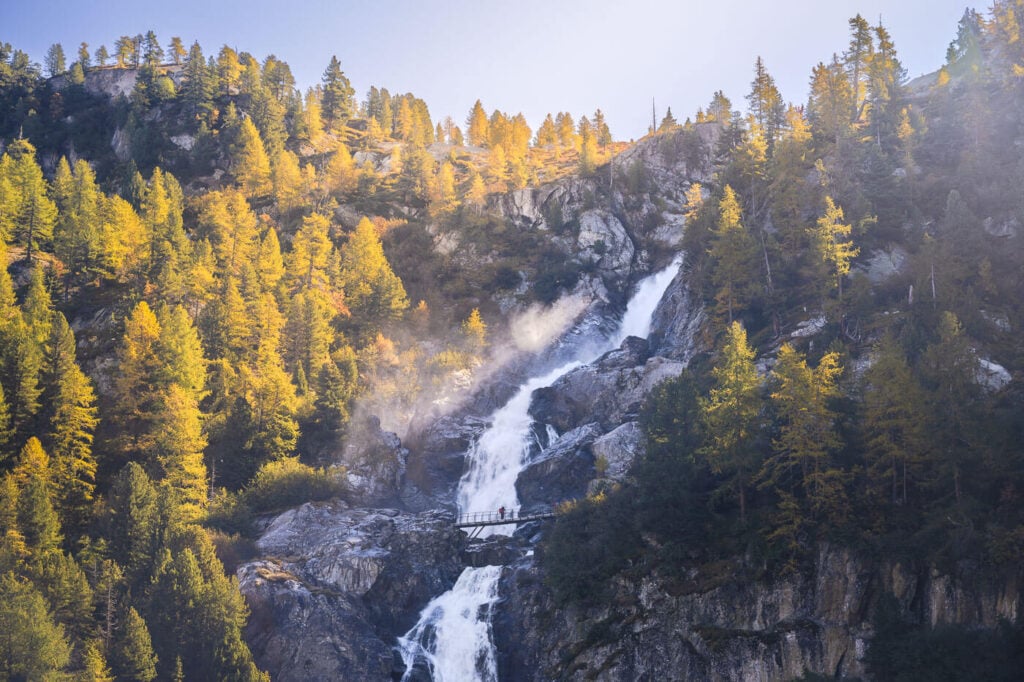
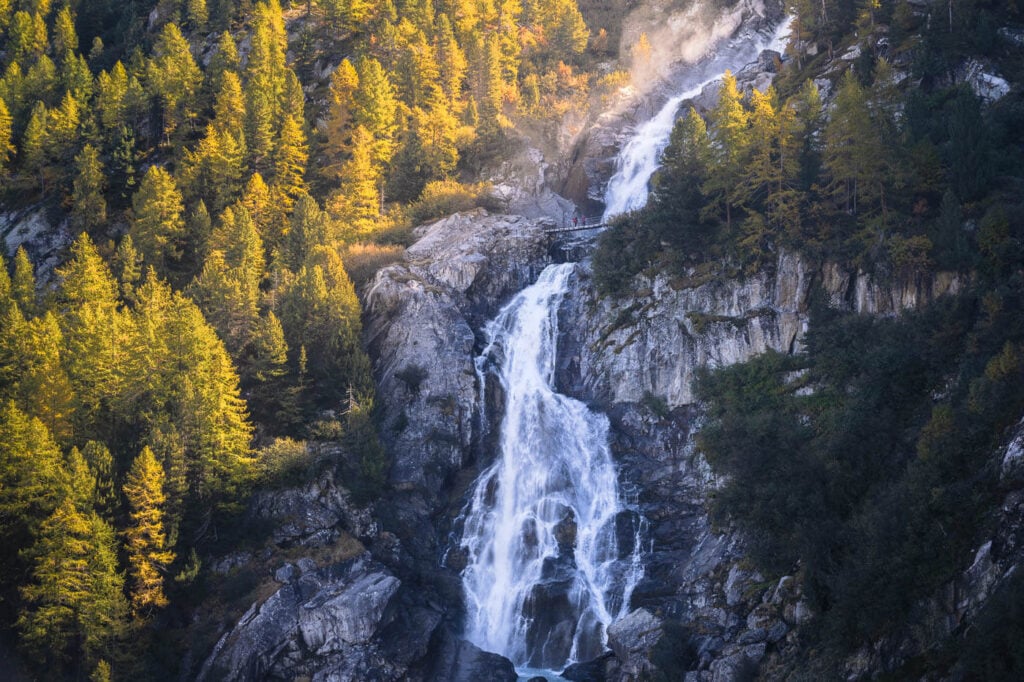
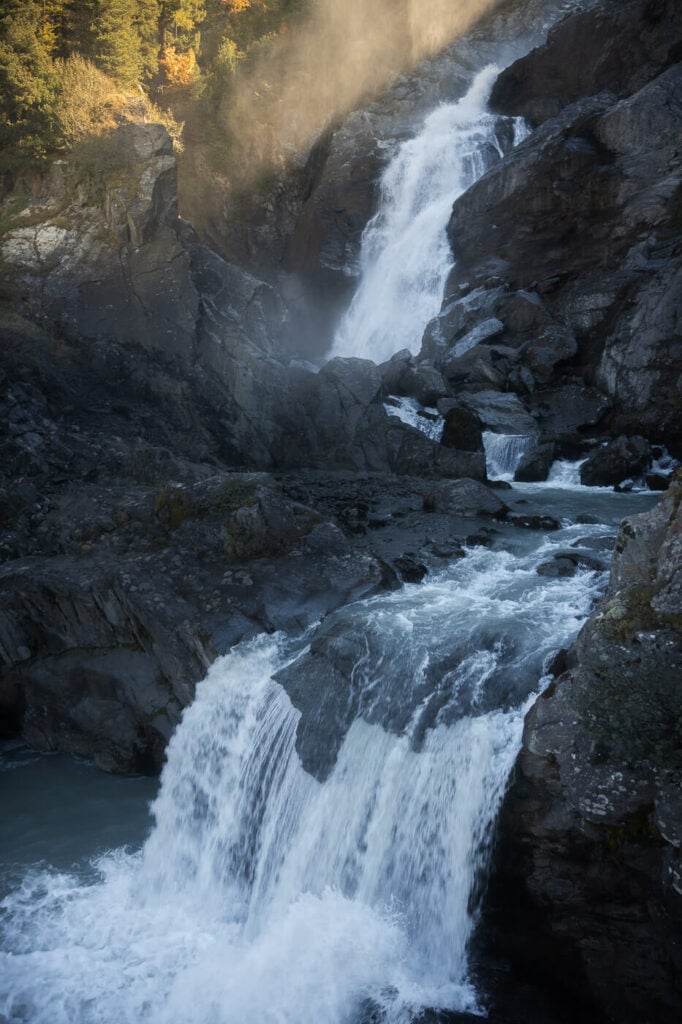
Second and Third Rutor Waterfalls, view from the Panoramic viewpoint. Can you see the man on the bridge?
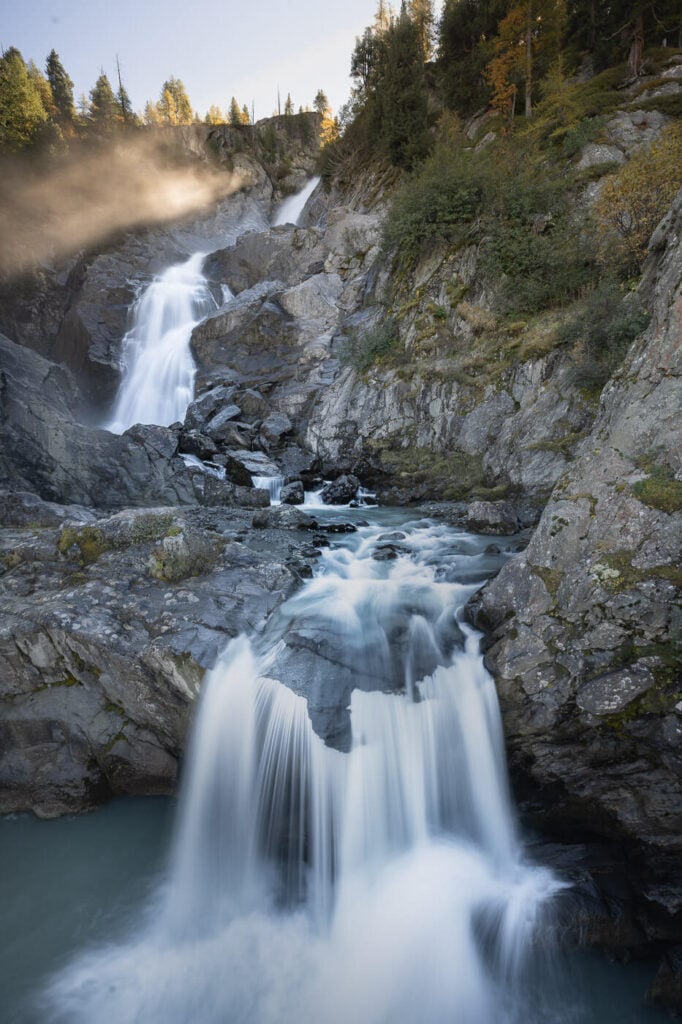
The Cascate del Rutor take their name from the glacier above them, The Ghiacciaio del Rutor (Rutor Glacier). The total height of the second and third waterfalls is impressive and the waterfall develops over multiple steps.

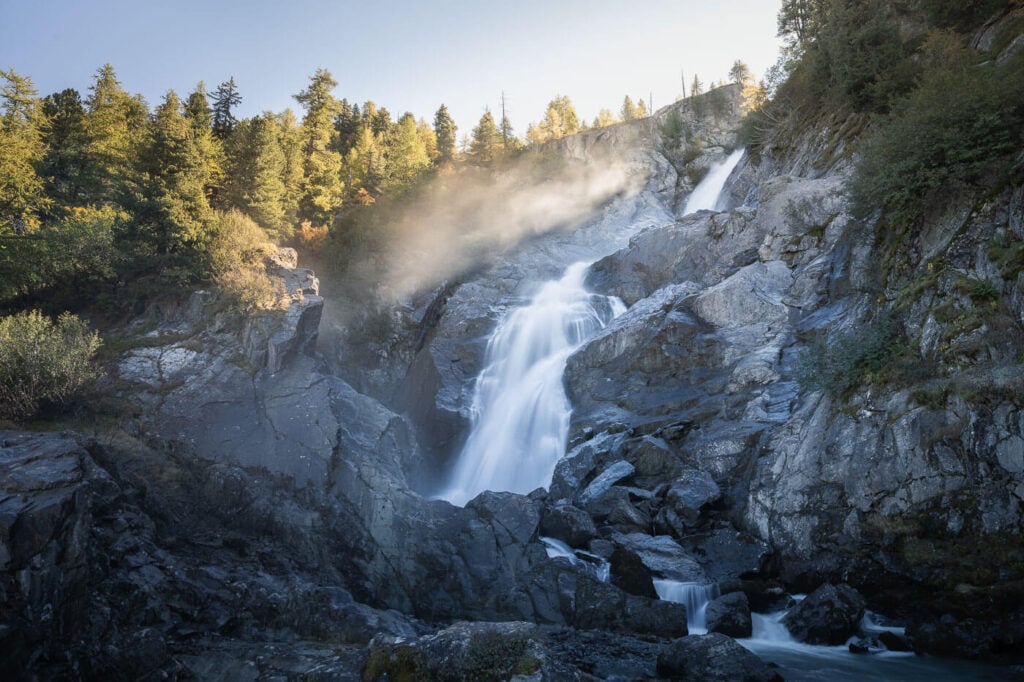
Upper part of the Third Rutor Waterfall
There are three main waterfalls, although there are several small ones in between, and the combined total height is over 700m. Yes, 700, there isn’t a “0” in excess.
The only problem is you can’t view them all at once, but you can get a good sense of scale from the main panoramic viewpoint. From there, you can see the second and third waterfall.

View of the second and third Rutor falls.
Table of Contents
Overview of the Cascate del Rutor Hike & Map
This is a loop hike, most commonly done clockwise. You could do it as an out-and-back hike too, but you would miss the fantastic viewpoint on the opposite side of the main trail – more on that later.

View from the Panoramic Viewpoint
Overall,hiking to the Rutor Falls isn’t particularly difficult. The trail is well-marked, there are no exposed sections.
The hike is typically possible from late spring/early summer to early autumn. But that depends on snow levels and ice conditions. Be particularly careful early and late in the season. There will be ice around the bridge between the second and third waterfalls, and it will be extremely slippery.

Bridge/viewing platform between the second and third Rutor waterfalls.
This hike isn’t possible in winter, but there are some marked snowshoe trails too in the area, and you’d probably be able to visit the first waterfall only.
| Max Altitude | 2,140 m |
|---|---|
| Distance | 10.1 KM |
| Elevation gain | 740 m ↑ / 740 m ↓ |
| Hike time | 04:00/ 04:30 Hours |
| Hike Difficulty | Moderate |
Here is the map of the hike to le Cascate del Rutor. Note that I hiked past the Third waterfall to a higher viewpoint above the valley, where there also are a couple of small waterfalls. If you have time to do it, I’d recommend hiking to that viewpoint too. It’s also a nice, sunny spot for a picnic, or to just enjoy the views of the surrounding alpine environment.
You can download the GPX file for free from the activity linked below, should you wish to do so:
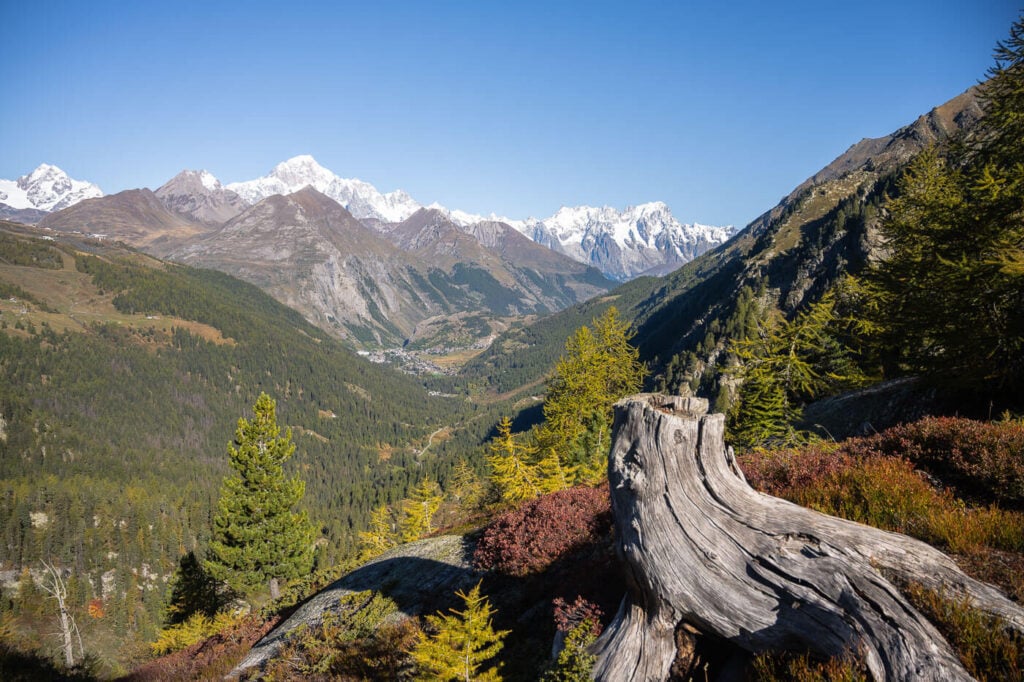
At a 20 minutes walk above the third fall, you can enjoy panoramic views of the whole valley.
How to get to the Rutor Waterfalls trailhead and Parking
The trailhead is located at the far end of the valley where the Rutor Waterfalls are. It’s a bit of a drive from different locations – but it’s an easy-to-reach location.
- Driving Directions: If you are coming from Italy or Switzerland, you’d first have to drive to Aosta and then to La Thuile. If you are coming from France, you’d need to cross the Mont Blanc Tunnel. Then Courmayeur, and then to La Thuile from there. From La Thuile, it’s a 10-minute drive to the parking area. Beware, the road is narrow in places.
- Parking: there is a paid parking spot at the end of the road. It’s paid up until around the end of summer. I was there in early October and the payment point was already winterized, wrapped up in a nice warm blanket and cellophane. However, that parking area is rather small and can take around 30-35 cars. there is another, free parking area further down the road, and you can start your hike from there too. Note that in high season, it’s only possible to access the paid parking area in La Joux from 9 am to 6 pm.
- Public Transport: there is a free shuttle service from La Thuile at the peak of the high season. Details here.
The Rutor Waterfalls Hiking Trail
From the parking area in La Joux, you’ll see some info board further down the road. That’s where the trail starts. The road will first turn into a narrow dirt road, then into a trail. The trail is quite nice in itself, with a stone path in the forest.

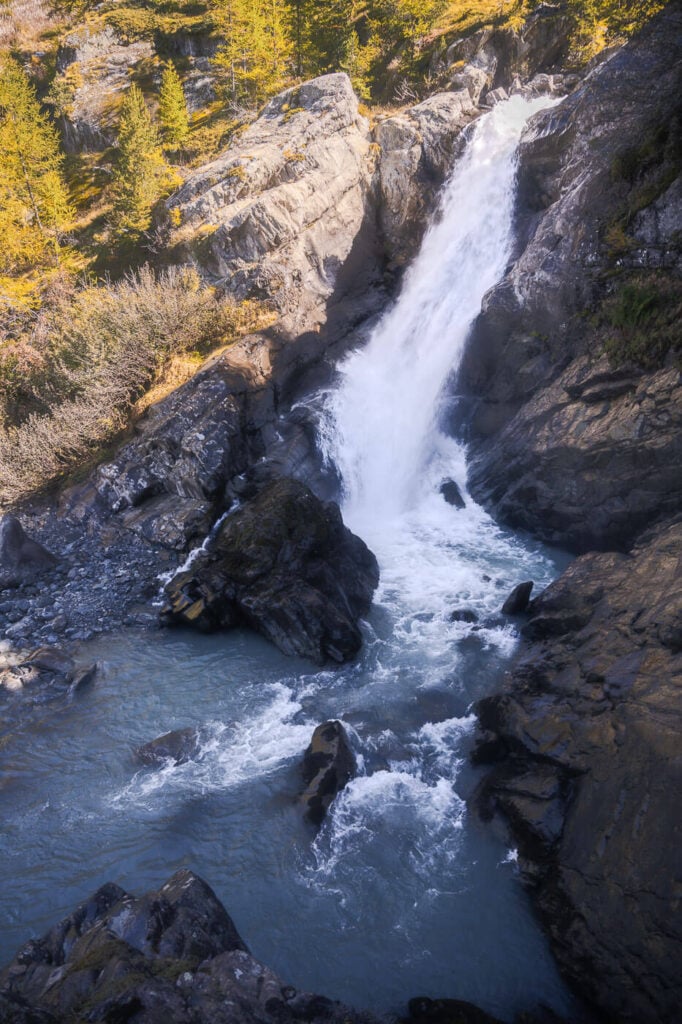
First Rutor Waterfall
The first waterfall of the Cascate del Rutor is a nice waterfall nestled deep into a ravine. It takes about 30 minutes or so to reach it from the parking area. The viewpoint is wide and it’s fenced.
You can get a good view of the waterfall from above, and there is no way to get down to the river.

The first Rutor Waterfall.
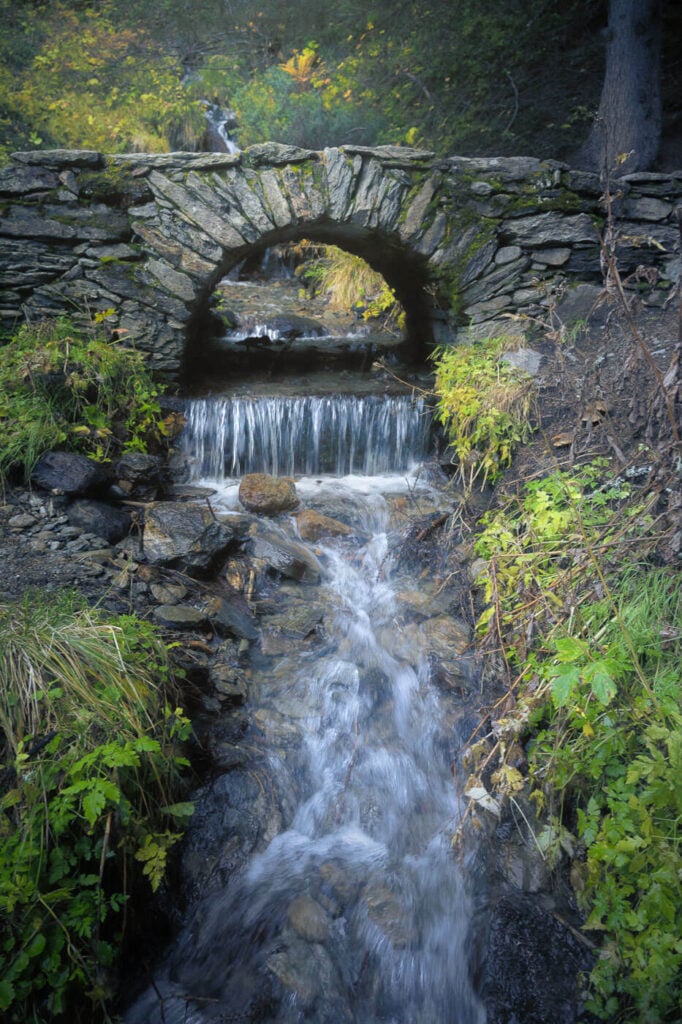
From the first waterfall, it takes quite a bit to reach the second one, about an hour. However, you’ll pass by smaller waterfalls on the way, like the one below for instance.
As far as I know it’s an unnamed waterfall, but I’ve seen it mistakenly mentioned as the second Rutor waterfall – it is not.

Second Rutor Waterfall
To get to the second waterfall, there is a signposted out-and-back detour from the main trail. It’s about a 5-minute walk. The viewpoint is on a narrow, exposed boulder right by the upper part of the second waterfall. Be careful, especially if wet. There is enough place for one or two people at most.
The viewpoint is very narrow, and the views of the waterfall are minimal. Still, you are so close that you can feel the water spray and how powerful the waterfall is.


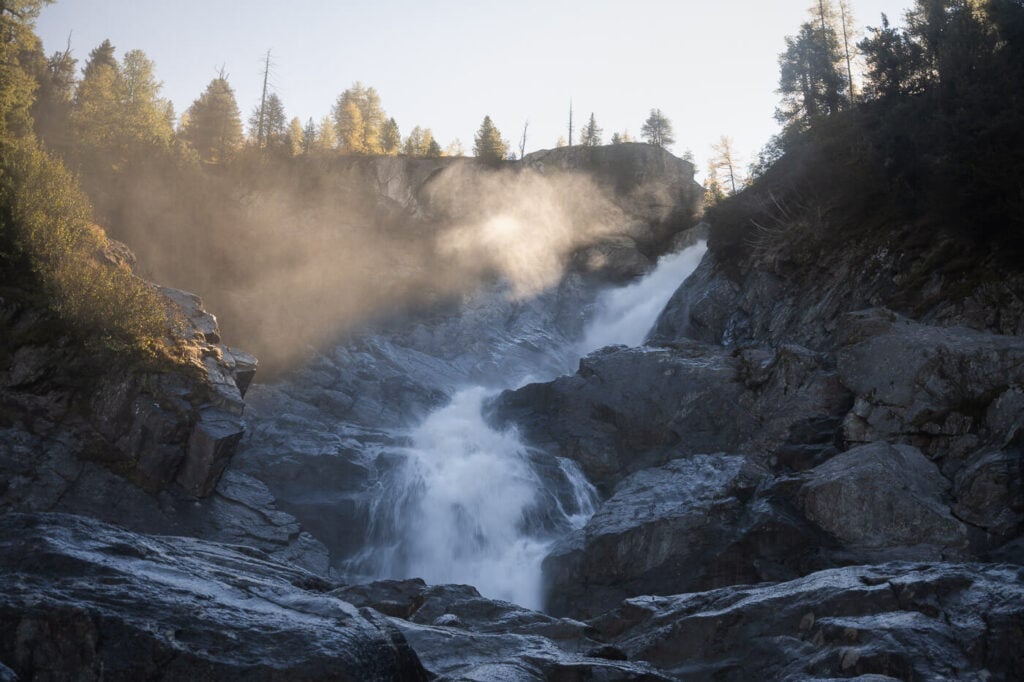
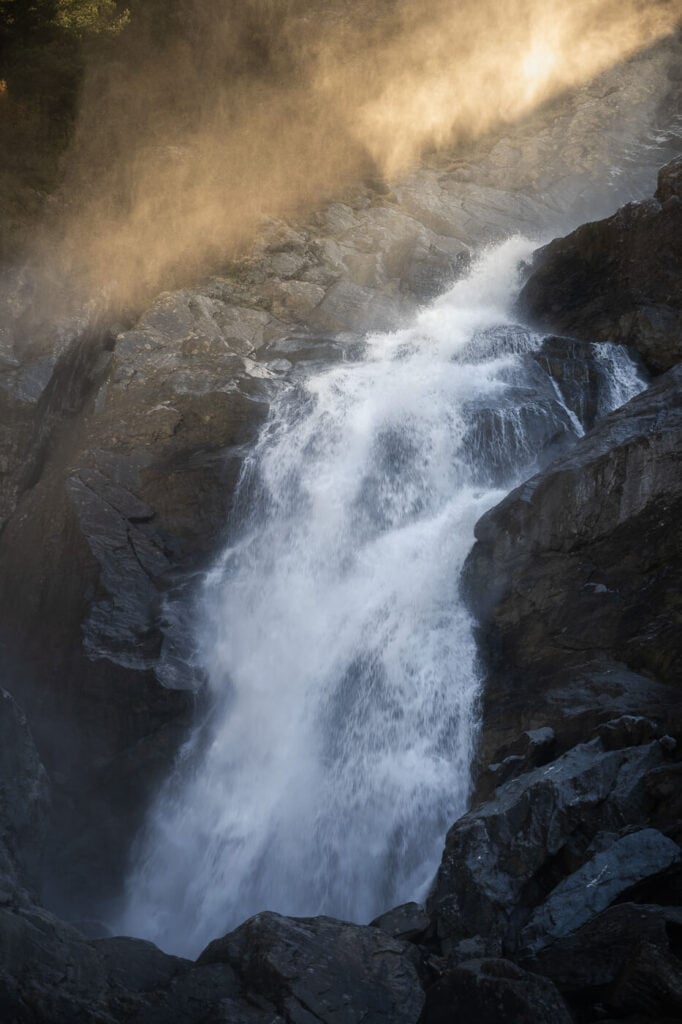
Third Rutor Waterfall
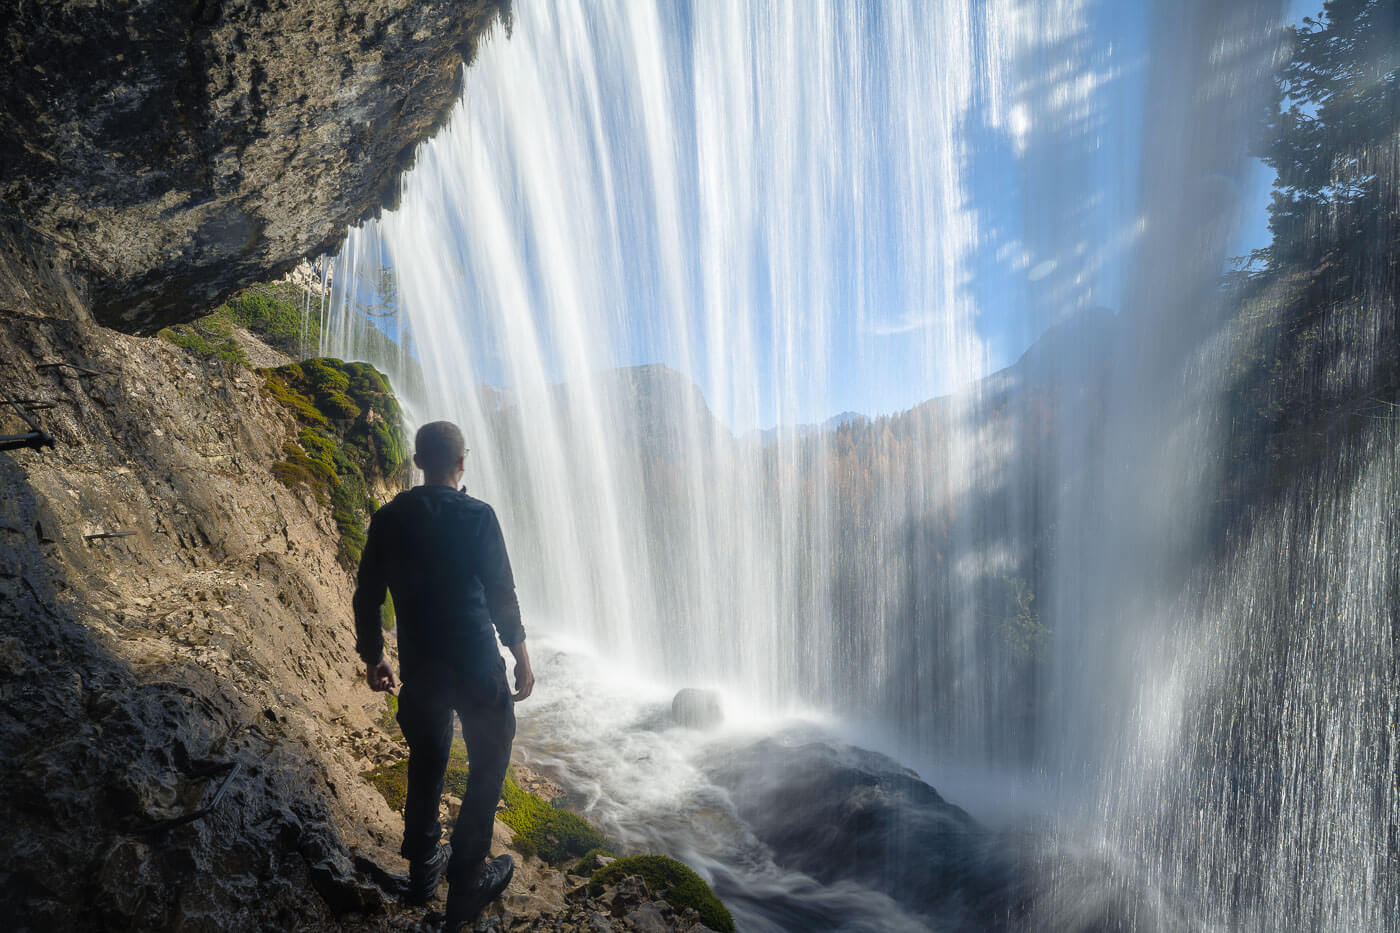
The Third waterfall is the one from which you can get the best views. It is located entirely on a rock wall you can cross using a pedestrian bridge.
The bridge offers some great views of both the upstream and downstream parts of the waterfall. As mentioned earlier be careful here late or early in the season, there can be ice on the path. In summer, prepare for a shower :)!
Upper part of the Third Ruto Waterfall
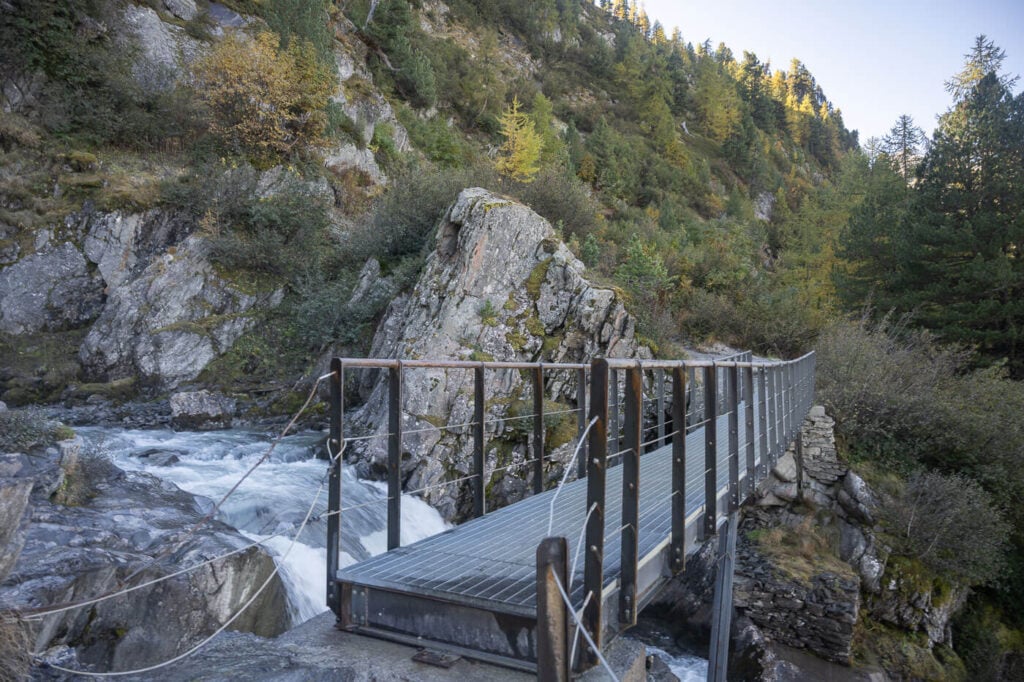
Pedestrian bridge across the river by the Third Ruto Waterfall.
The area is fenced too, and you also have good views of the falls on either side of the river. The third waterfall and its multiple steps are worth the hike alone.
Here is also where you can feel the power of the waterfall, as you are essentially on top of it. You can watch the powerful stream descending toward you, and pouring water down the valley.

View of the upper part of the Rutor Falls from the bridge.
Here is the turning point of the hike too, meaning you start descending from the opposite side. However, if you have more time and want to spend more time on the mountain, you can also hike up to an other viewpoint above the valley, the one I mentioned earlier.
You’d need to backtrack first and then keep following the trail upstream until you reach the river again. This is the sport I mentioned earlier, a nice location ofr a break.

At a 20-minute walk above the third fall, you can enjoy panoramic views of the whole valley.
Rutor Waterfalls Punto Panoramico (Panoramic viewpoint)
The best panoramic viewpoint of the Rutor Waterfalls is just a ten-minute walk from the bridge, downstream, and on the opposite side from where we just came. Here, you have the best view of the second and third waterfalls combined.This makes it the best point to have a good sense of the true size of the warterfalls.
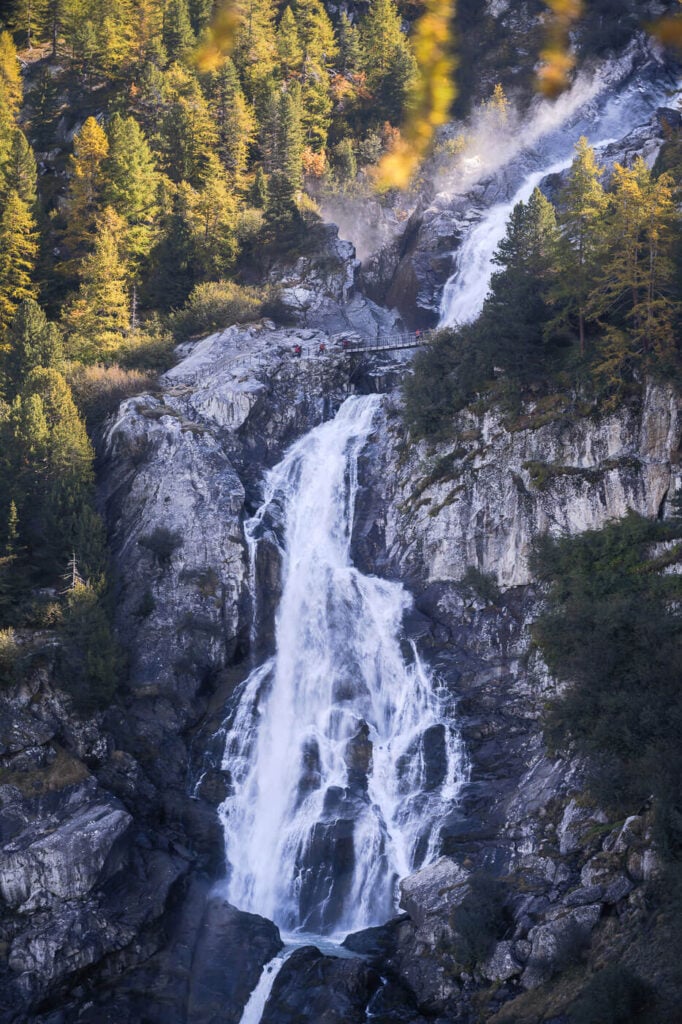
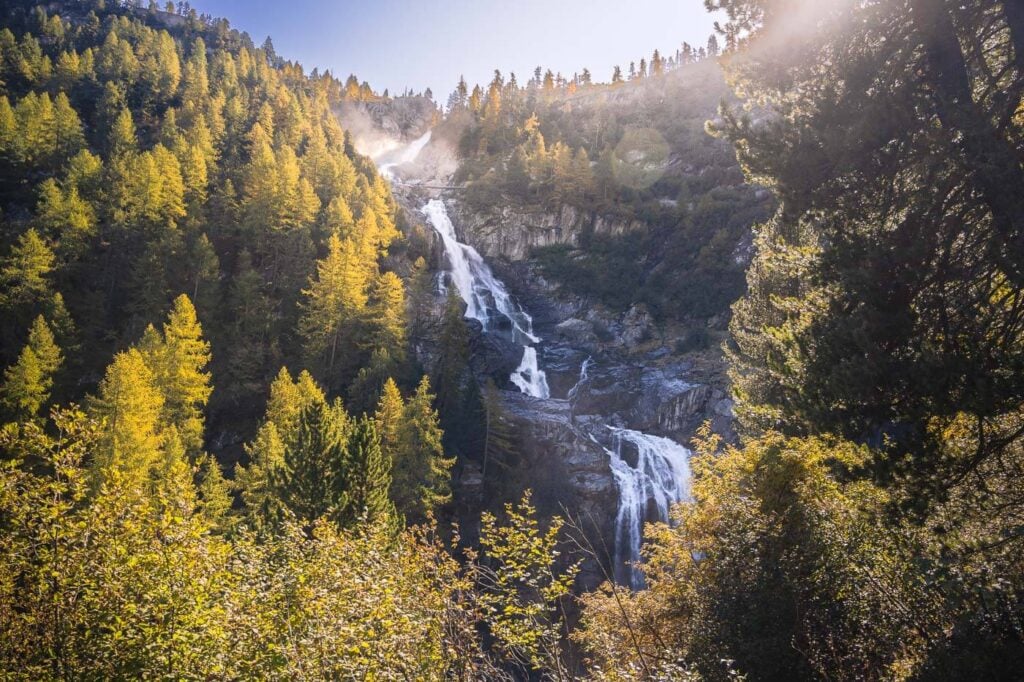
That’s the longest stretch of this series of waterfalls and the best point to get a sense of scale. Also because you have a view of the bridge, where there will likely be some “minuscule” humane figures passing by, or stopping there to take some photos.
There also are a couple more, smaller waterfalls on the way down, like the one below for instance.
Cascate del Rutor Hike – Waterfalls Photos, Photography Tips, and Best Viewpoints
I won’t deny it—these falls are somewhat difficult to photograph. This is for several reasons, which I now proceed to clinically enunciate before getting into the details. There are limited viewpoints, accessibility is limited, and last but not least, the falls don’t get much light throughout the day.
The first, but especially the second waterfalls, have very limited viewpoints. While there is a large viewing platfrom above the first waterfall, the waterfall itself is nestled deep into a ravine. You can get a good view of it, but it’s still kind of limited in what you can do in terms of compositional choices, between the platform and the vegetation.

First Rutor Waterfall
The second one offers the narrowest of viewpoints on this trail. It’s just a little spot on top of a rock, very close to the waterfall. So here compositional options are very limited too.
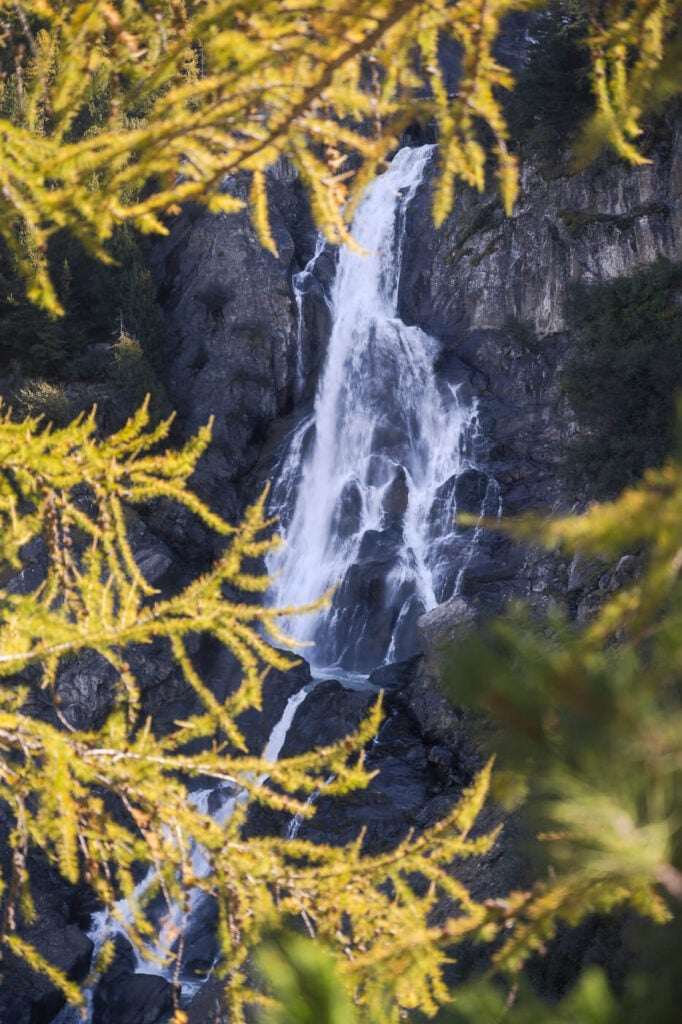
Now onto the third – this is the waterfall that makes up for the first two, photographically speaking. Still, the limited light and limited viewpoints apply, but it’s the one you have the best views of. Either from the area around the bridge or from the panoramic viewpoint.
The Thir waterfall is the one I had the most fun shooting at. First around the bridge, using both my 14-24 and 24-70 lenses, to capture both the wide and smaller details of the falls.
Then, from the panoramic viewpoint, I enjoyed capturing more “abstract” views of the fall, in between the branches, for something a little different from the usual waterfall shots. I think it made a nice contrast between the warm light hitting the tree branches and the darker view of the falls.

In terms of lenses – a normal 24-70mm range (full frame) or similar will be enough in most cases. You’d need wide, like 14mm or more wide, if you want to fit more of the third waterfall in one single frame,
I didn’t bring my telephoto lens this time, but I kind of regretted it. It would have been useful from the Panoramic viewpoint, to be able to zoom in on the bridge from afar. This was the view at 70mm.
I guess a good excuse to visit once more next year!
Where to stay
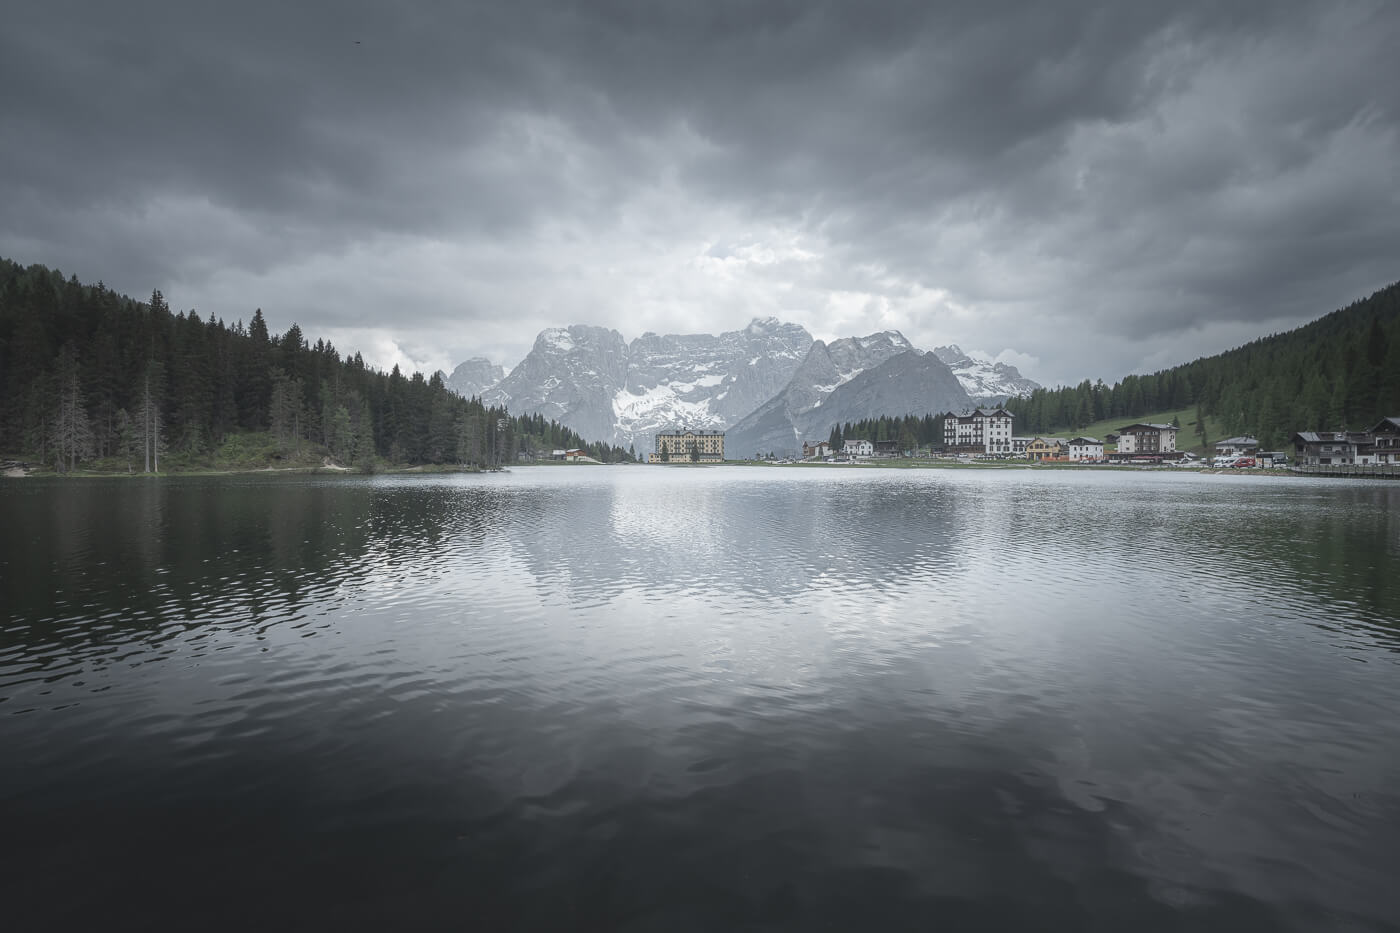
La Thulie is the closest location – a small tourist village and popular ski resort in winter. Also good for a couple of days for more hikes in the area, or just enjoy the peace and tranquillity of the “Wild Side” of Mont Blanc as they promote it here.
If you are in a camper or in a van, there is also a dedicated parking area in La Thuile, with basic facilities. The price is 20 Euros per night as of 2024. Free to access in early autumn, but the facilities are closed. The area is called “Area Camper Grand Assaly” It’s the one I stayed at in my van too.
Additional Resources
- Here’s the main page on Hiking in Italy, if you want to discover more scenic hikes and photo spots.

Leave A Comment