The Hveradalir Hike in Kerligafjöll
The Hveradalir geothermal area Hike in Kerligafjöll is one of the most scenic and colourful hikes in the central Highlands of Iceland.

Hiker on a trail in Kerlingafjoll
Also known as the Hveradalahringur (Hveradalir Circle) Hike, the hike I’m reporting here is relatively short and easy. It’s only 4km long, but short detours on other trails are possible, which is why the GPS track below the hike I went on is 7km long instead of 4km.
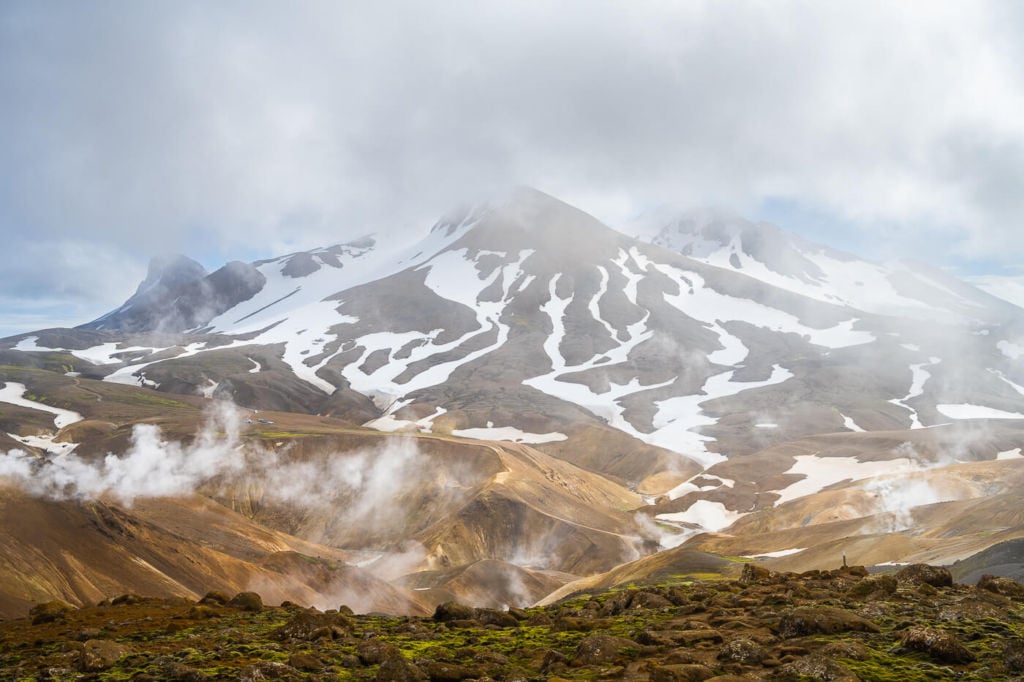
This is one of the areas in the Highlands of Iceland where the earth feels most alive. It’s a symphony of colors and shapes.
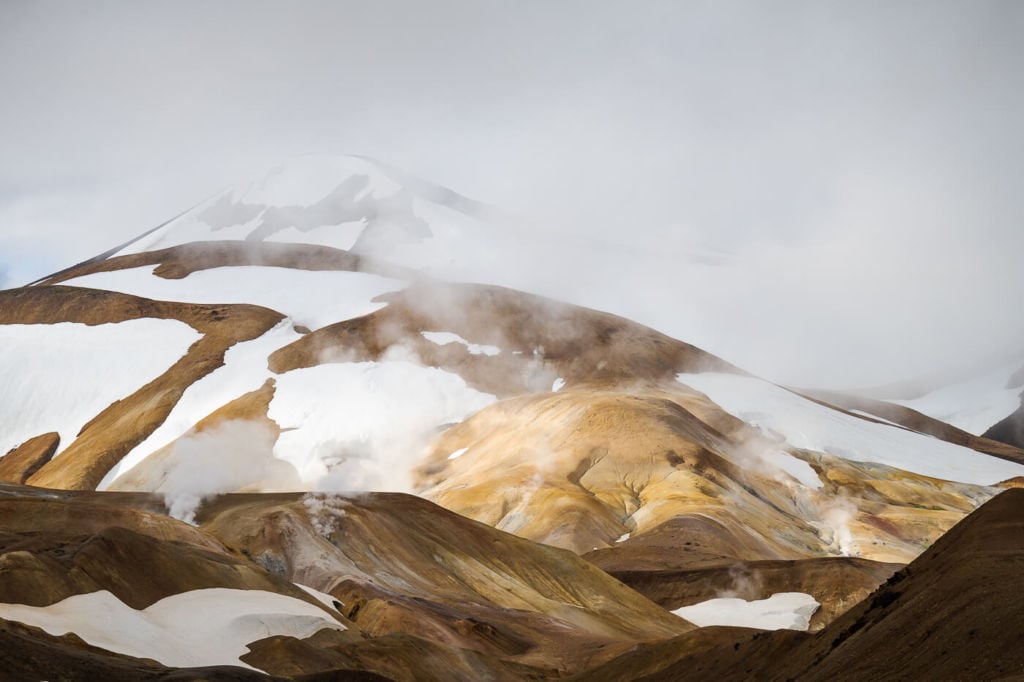
Shapes in the fog

Vapour from fumaroles will keep hiding and revealing part of the landscape.
Outline of the Hveradalir Hike in Kerligafjöll
- Getting there: By car, you would need to drive road 35 either from north or south. Even though it is no longer an official f-road and there are no river crossings, Road 35 is rough, especially its northern part. Regardless of the road 35 status, you will still need a car that can be used on f-roads to drive on road F347, a side road to road 35 that connects to the Kerligafjöll area. Alternatively, you can take the Kjolur Route Bus. There are day tour options and a more comprehensive schedule if you want to explore the area for longer than one day. If you are looking for car rental options, I can definitely recommend Blue Car Rental for cars and CampEasy for Camper Vans.
- Start of The Hike: the Keis Parking Area – click for directions. This parking area is situated a few kilometres past the mountain resort. Once you’ve reached the mountain resort, keep following the road until you get to this parking location. You can also start the hike from the mountain resort if you wish, but be aware that would add 4km to the hike (each way, so a total of 8km).
- Photography & Scenery value: considering the very unique nature of the landscape here, one’s creativity is the only limit. The location suits classic landscape photography, but there is a somewhat “surreal” feeling to it. The many colors and mountain layers also fit abstract landscape photography.
- Difficulty: easy to medium
- Tip: there is a very scenic “horseshoe” bend on the way to the parking area. That’s definitely worth a photo stop. There is a small parking area on the side of the road. The GPS coordinates are 64.671845, -19.282947.

On the Trail
As mentioned earlier in the post, the official trail is about 4km long, but with my detours, it became about 7km. I also did it clockwise, but it’s possible to do it counterclockwise, which is what most people seemed to be doing.
| Distance | Ascent | Duration |
|---|---|---|
| 4Km (official trail) / 7.24Km | 560 Mt | 3:30/4:00 Hrs |
Once on the trail, hikers should take great care and avoid hiking outside the marked trails. The terrain here is particularly delicate, and footprints will leave ugly marks for a long time. You can, unfortunately, see some of these examples along the trail. The trail is also very muddy in places, and it’s sticky mud. So even though the hike is relatively easy, I recommend using proper footwear.

The first set of steps from the Kies parking area
Anyways, back to the trail. From the Kies parking area, the trail will first head downhill through a series of steps. You are immediately immersed in a very active geothermal area when you reach the bottom of the gorge at the end of the steps. Several different trails will head in different directions from here. If you’re like me, you will probably want to hike all of them simultaneously! ..not an option, though, unfortunately. But I did try, as you can see from the GPS track below :)

Trails on the side of the mountain.

Crossing trails
Whichever way you choose, I recommend taking the one in the middle first; it leads up the small hill in the centre. You will recognise it immediately as it’s the hill everyone takes photos of. Technically, there is a trail that connects to the Hveradalir circle, but it was closed when I visited. So I had to backtrack a little and take the other set of steps to continue the hike.
From here, the trail will slowly climb up to the highest point in the hike, where it turns back toward its start. You will come across countless geological features, and you will probably stop several times along the trail. Each stop will definitely be worth it!

There’s an active fumarole in this part of the trail…

..which erupts every five minutes. Pretty amazing to see. ..and scary if you forget about it!
Additional note on Safety
The water reaches boiling temperature in some places. Take great care when walking close to those areas. They are also well-marked.
Photos and Photography tips for the Hveradalir Geothermal Area in Kerligafjöll
This is one of the areas I had the most fun shooting at on my last trip. That may also be because it was my first time here and perhaps because this location was way better than anything I expected.


Apart from the classic two or three compositions we all shoot, this location has a surreal touch. I’m not entirely sure what it is, perhaps the smoke from the fumaroles, the fog and the colors of the landscape. They all seem to come together to create some sense of “unknown” or “mystery” feel in the landscape.


The presence of hikers along the trail adds another layer to that sense of surreal. Small dark figures in such a landscape do provide a striking visual effect. These “figures” remind me a bit of those in De Chirico’s paintings – with all due respect. The already mentioned unique and intense colors of this landscape add to that impression, perhaps. You won’t find this in many other locations, and it’s something unique to Kerligafjöll, at least in Iceland.


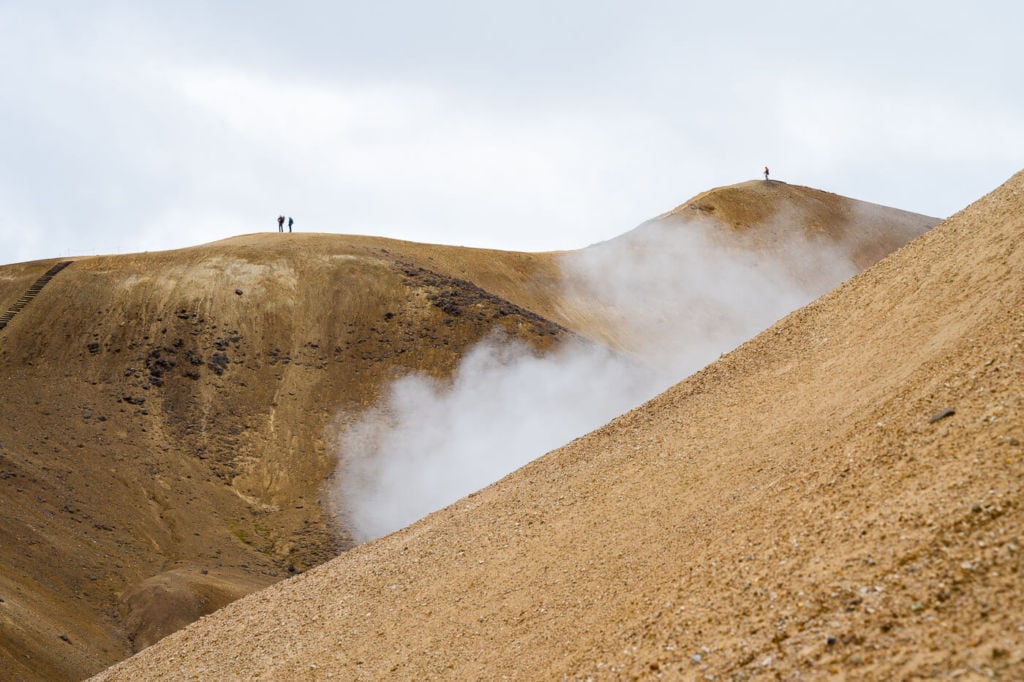

Hikers on the other side of the loop.
In terms of lenses, this is one of those locations where each lens will find its use. Bring all the lenses you have. On drones: Kerligafjöll is a protected area, and the use of drones is not permitted.
Video of the Hike
If you want to have a feel for the trail, here is a short video of this hike:
Map of the Hveradalir Hike in Kerligafjöll
The trail is well marked and easy to follow. If you need a GPS track, you can download the .GPX file from the Komoot activity:
Where to Stay
The Kerlingarfjöll Mountain Resort in Ásgarður is closed in 2022 and will reopen in 2023 as it is undergoing renovations. This will be the closest option to hiking the Hveradalir Circle and other longer trails in this area.
Apart from that, there are additional accommodations both to the north and to the south of road 35, the closest of which seems to be the Hveravellir centre.
Additional Resources
- There is a comprehensive PDF overview of all the hiking trails in the Kerligafjöll area on the ust.is website (The Environment Agency of Iceland). You can download a copy here.
- Check out more geothermal areas: Hveravellir and Seltún.
- Do not miss Gullfoss on Road 35 if you are going to or coming from Kerlingarfjoll!
- Check out more Photo Hikes in Iceland here.
- Discover the best hiking books and guides on Iceland.
Car or Camper Van Rentals
I can definitely recommend two companies here:
- Cars: Blue Car Rental, (5% discount through The Photo Hikes) which is the largest Car rental company in Iceland, and for good reasons. Free Cancellation, Unlimited mileage, 24-hour breakdown assistance, SCDW, CDW, TP, and GP insurance are included in the price. Blue Car Rental is also located within walking distance of the Keflavik Airport, so you can be on your way to explore Iceland right away. I’ve always been happy with my rentals there, which is why I’m happy to recommend their services here on my blog.
- Camper Vans: CampEasy. With CampEasy, you can rent 2WD or 4×4 campers alike. With a raised Chassis, larger tires, and extra insurance with reduced liability for river crossing, their 4X4 campers are the best choice for your trip into the Highlands. Their Website also provides extensive information about roads you can take and instructions on river crossings. Perfect choice for a hiking holiday in the highlands!
These are my two favorite companies in each respective rental area, which I why I am happy to recommend both here. If you also like this blog, booking through them is a great way to support it. I’ll get a small commission fee at no additional cost, so you can essentially support the running costs of this blog for free too.


Amazing information. I stumbled onto this blog on Flickr and this perspective and incredible recommendations are such a wonderful surprise.
Thanks Larry, thanks for taking the time to comment, and glad you enjoyed the content!