The Kollfjellet Hike on Flakstadøya – Lofoten Islands, Norway
The Kollfjellet Hike on Flakstadøya is a hike that offers fantastic views over the Flaksdtadpollen bay and its Turquoise waters. Reaching the top will require some effort, but the hike is relatively short, and the views are more than rewarding.
This hike offers a great photographic opportunity and some of the best views over the turquoise waters of the Flakstadpollen bay. While it is relatively short, I would consider the hike of medium difficulty. This hike requires some off-trail navigation through a birch forest and avoiding sheep trails that will look like proper hiking trails. Damn tricky sheep :)
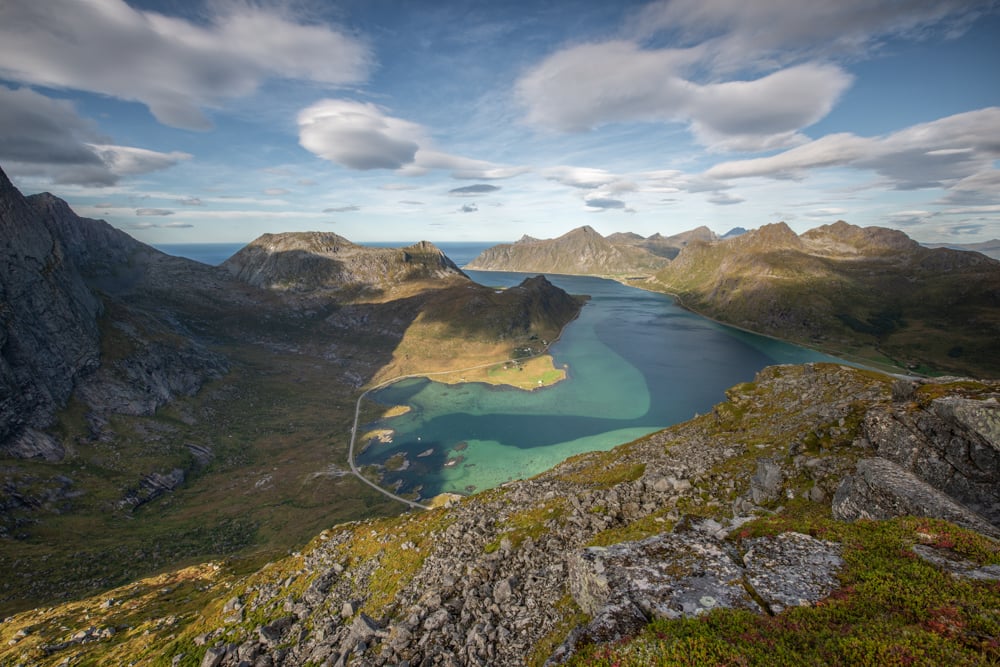
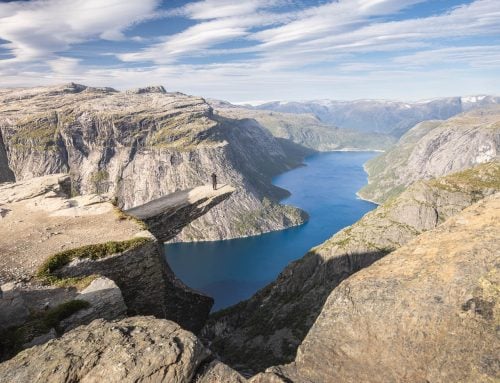
View from the top of Kollfjellet. Hustinden can be viewed in the middle in the distance, and Flakstadtind is the other mountain in front of it.
However, once you reach the top, the rewarding views will make your effort worthwhile. To me, the Kollfjellet hike is also a very underrated photography location. You don’t see photos from here very often, and this scenic location has a lot of untapped potential for photography, both in different seasons and lighting conditions.
How to get to Kollfjellet & Outline of the Hike
- Getting there: From the E10, you can turn towards Nusfjord and park the car in the first wide clearing by the side of the road.
- Start of the Hike: from where you park the car, you’ll see some trails leading into the dense birch forest. You can take any of these and heads toward the general direction of the summit.
- Photography & Scenery value: the views are fantastic all around the trail once you clear the birch forest, but the top offers the most photogenic ones. This vantage point would be great for the northern lights if you plan to camp up there.
- Difficulty: Medium, considering the hike is pretty short. The first part in the birch forest makes for tough going. The last part of the ascent is quite steep.
- Tip: I would recommend hiking up there when the tide is high. You’ll get the best colours out of the turquoise waters of Flakstadpollen bay. At low tide, water levels will be considerably lower in the bay.
The Kollfjellet Trail
| Distance | Elevation Gain | Hike Time |
|---|---|---|
| 3.83 KM | 460 Mt. | 2/2.30 Hrs |
Let me start by wishing you the best of luck for the first bit of the trail. While you may initially pick up some fain tracks, you will soon find yourself amid a very dense birch forest. Your backpack may get entangled in some of the branches. Also, be wary of the boulders and where you step. You want to avoid falling into a hidden crack between boulders.
But enough with the warnings! You’ll soon be out of the woods, and the summit will be in sight again. After that, the trail will ascend towards the top and gradually become steeper. You will need to be careful of the sheep tracks here. Don’t let them tempt you :)!
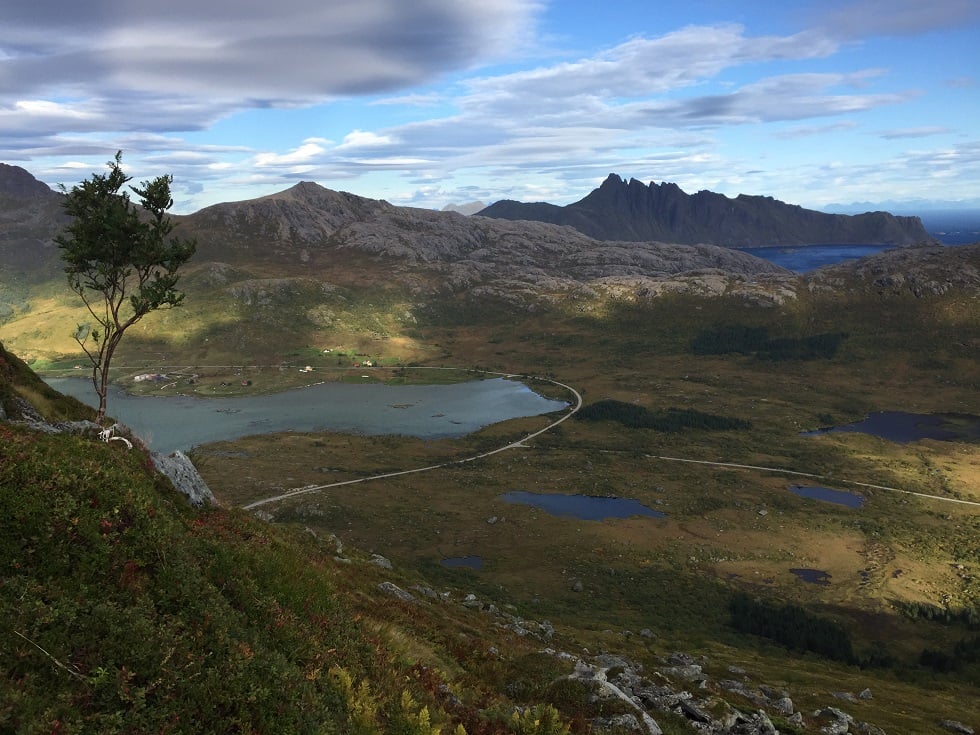
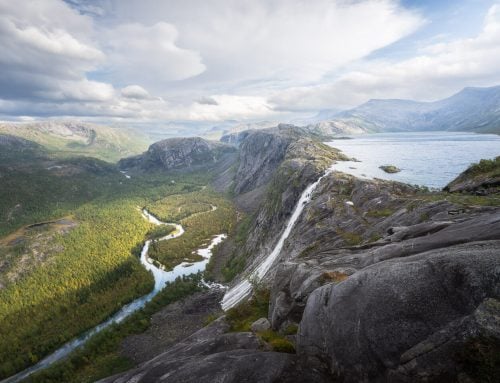
View towards the start of the hike. The two roads are the E10 and the road to Nusfjord.
The hike will become increasingly steep, and you will need to find your best way up the mountain. However, before you reach the top, the trail will gradually flatten, and at the very top, the vantage points are all primarily flat. Here, you can sit, snack, and enjoy the well-deserved views before taking some photos.
I would recommend following the same route you came from on your way back, as the circular hike around the top will cross very steep and exposed terrain.
Photos and Photography Tips for the Kollfjellet Hike on Flakstadøya, Lofoten Islands
Unless you can find opportunities for abstract photos in the thick birch forest, the first part of the trail does not have much to offer. However, as you get out of the woods, you’ll get better views of the surrounding landscape and Lake Storvatnet.
In some of the steepest parts of the hike, you may find some small bushes that could make for a good foreground, giving at the same time depth to the photo and showing the steepness of the terrain.
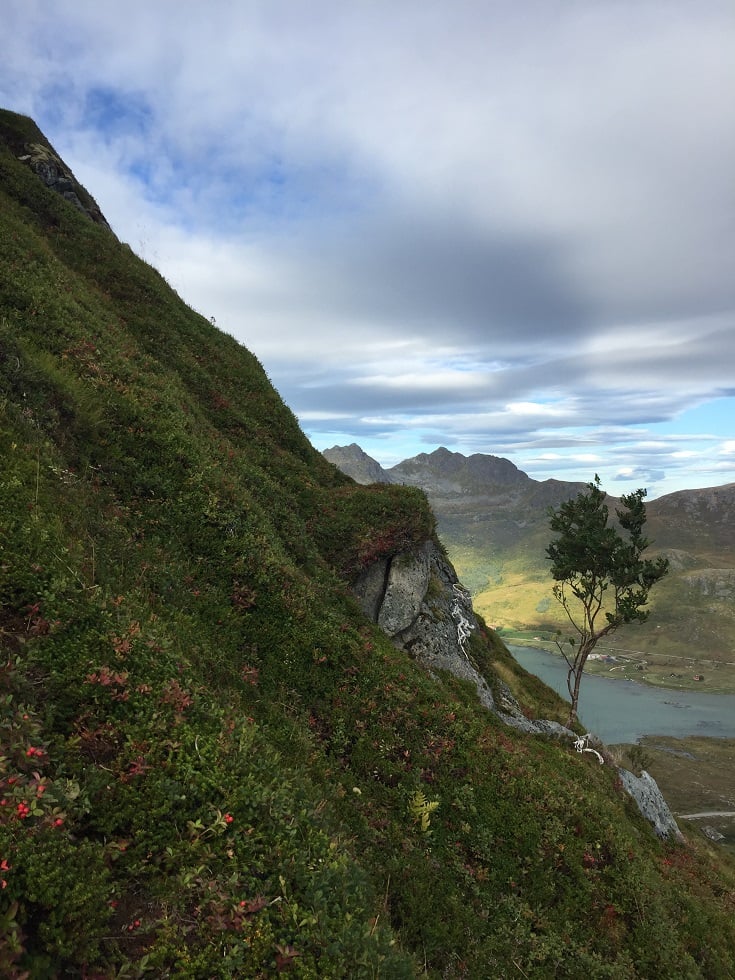
One of the steepest bits of the hike.
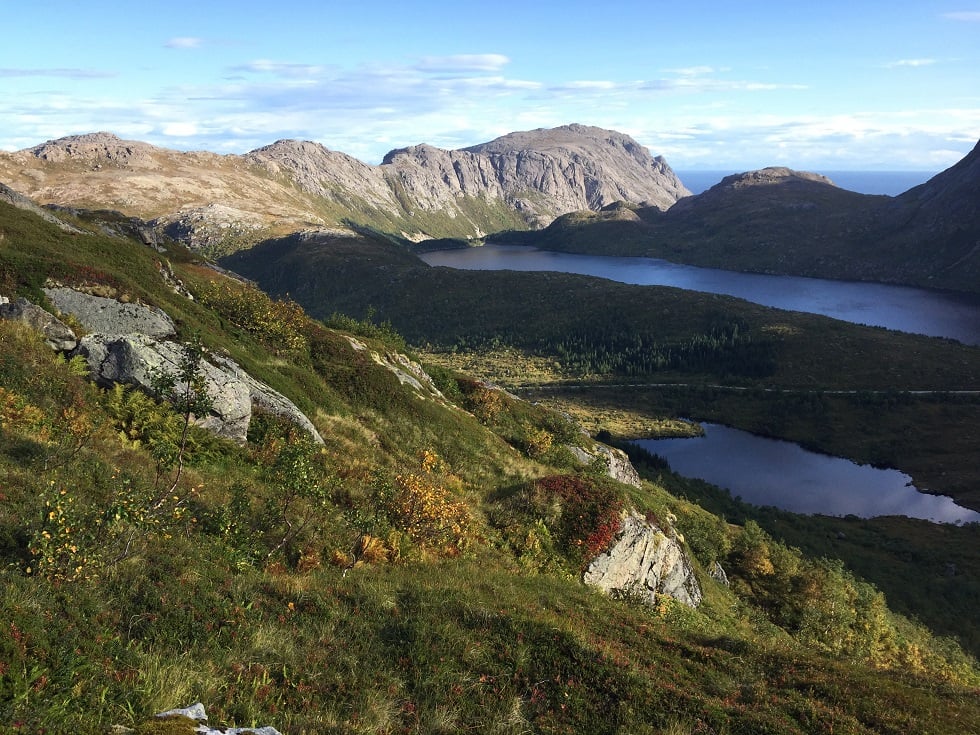
View towards Storvatnet
Once you reach the top, the view will open up to the sight of the turquoise waters of the Flakstadpollen bay. The contrast between the shallow areas and deeper parts of the fjord designs lovely leading lines and makes for a great addition to the already fantastic landscape. You will have fun looking for all the possible different foregrounds the summit has to offer.
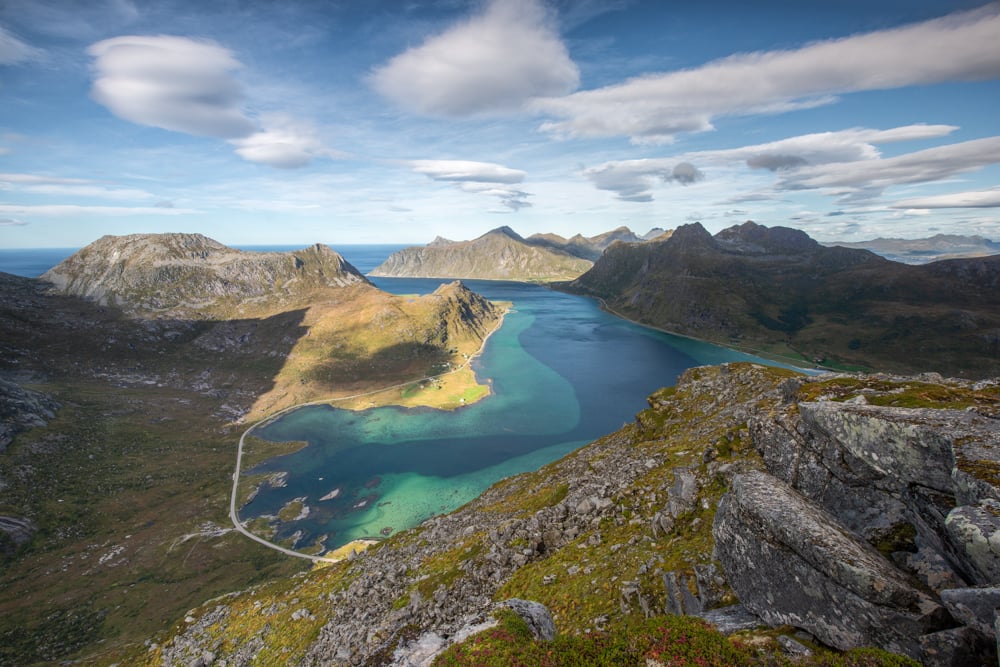
View over the Flakstadpollen fjord.
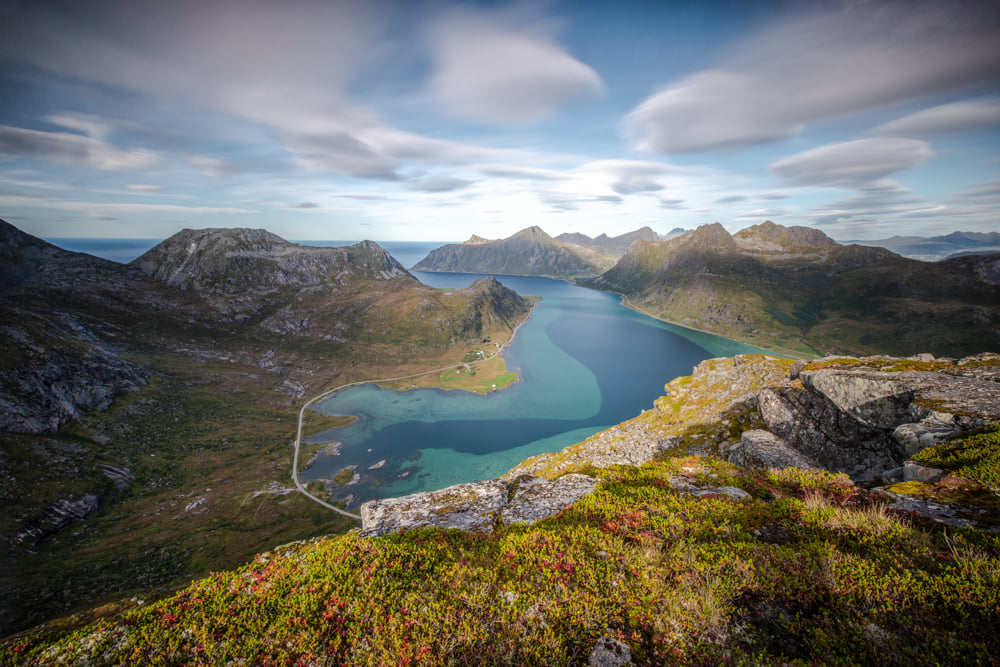
View over the Flakstadpollen fjord, long exposure of 237 sec.
The place is also suitable for Panoramas as the surrounding mountains and jagged terrain can frame the bay nicely.
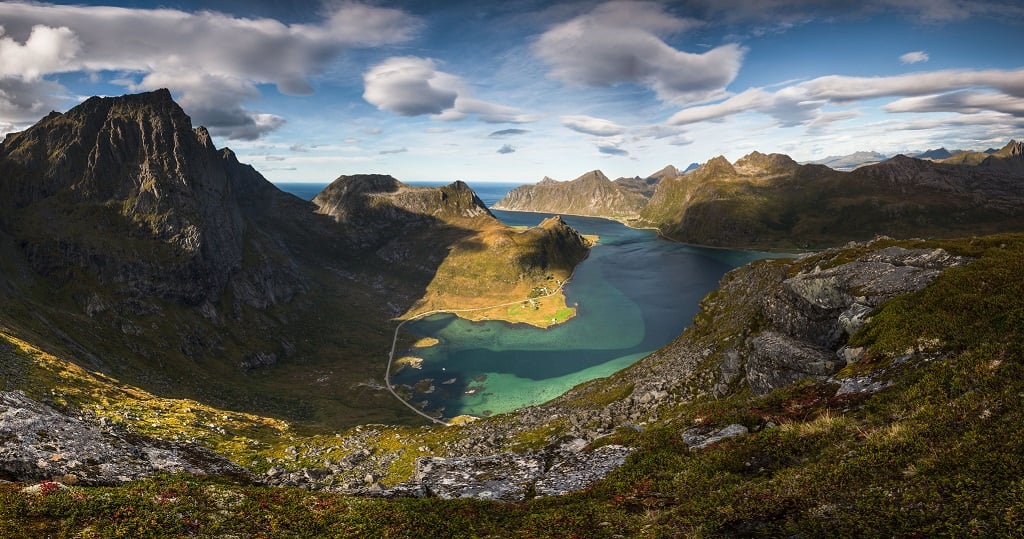
Panorama made with seven horizontal frames.
I would recommend anything between 14mm and 70mm in terms of lenses, but if you also enjoy shooting with a tele lens, you may also have fun taking photos of the farther away peaks with anything above 70mm.
Map of the Kollfjellet Hike
Here is the map of the hike from the parking area. If you need a GPS track, you can download the .GPX file from the Komoot activity.
As mentioned earlier, I would recommend going back the same way rather than going around the summit, as the part behind is very steep and exposed.
Where to Stay near the Kollfjellet Hike on Flakstadøya
There are several different options you can choose from if you are planning to spend the night in the area:
- Camping on top may be an option, as several clearings are suitable for a tent. As I mentioned early, I believe this would be a great location to shoot the northern lights.
- The Lofoten Beach camp in Skagsanden
- Ramberg also offers several accommodations and additional facilities like coffee shops, supermarkets, and dining options.
Additional Resources
- Planning a trip? Here are my tips to plan a trip to the Lofoten Islands.
- Check out the main page on Hiking in Norway for more Photo Hikes and inspiration.

Leave A Comment